Contact
Arture BV
Artjan & Niels
Alblasserdam, The Netherlands
078 204 9146
KvK: 74573527
General: info@orderpickingapp.com
Support: support@orderpickingapp.com
Frequently Asked Questions
Add-on
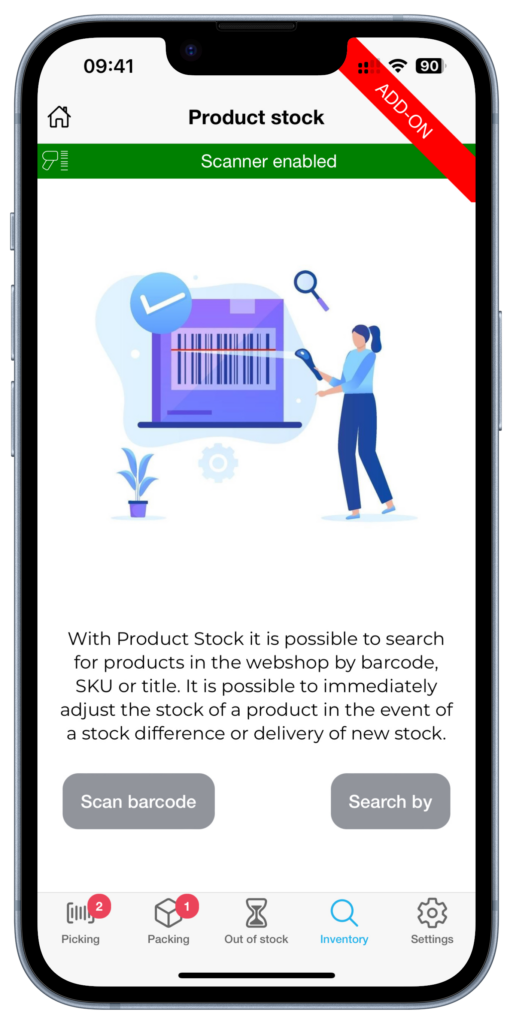
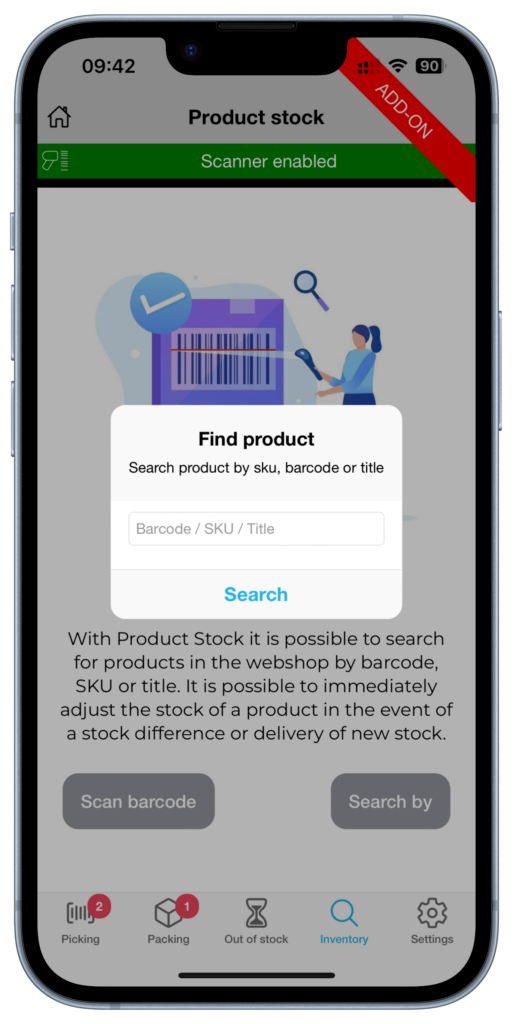
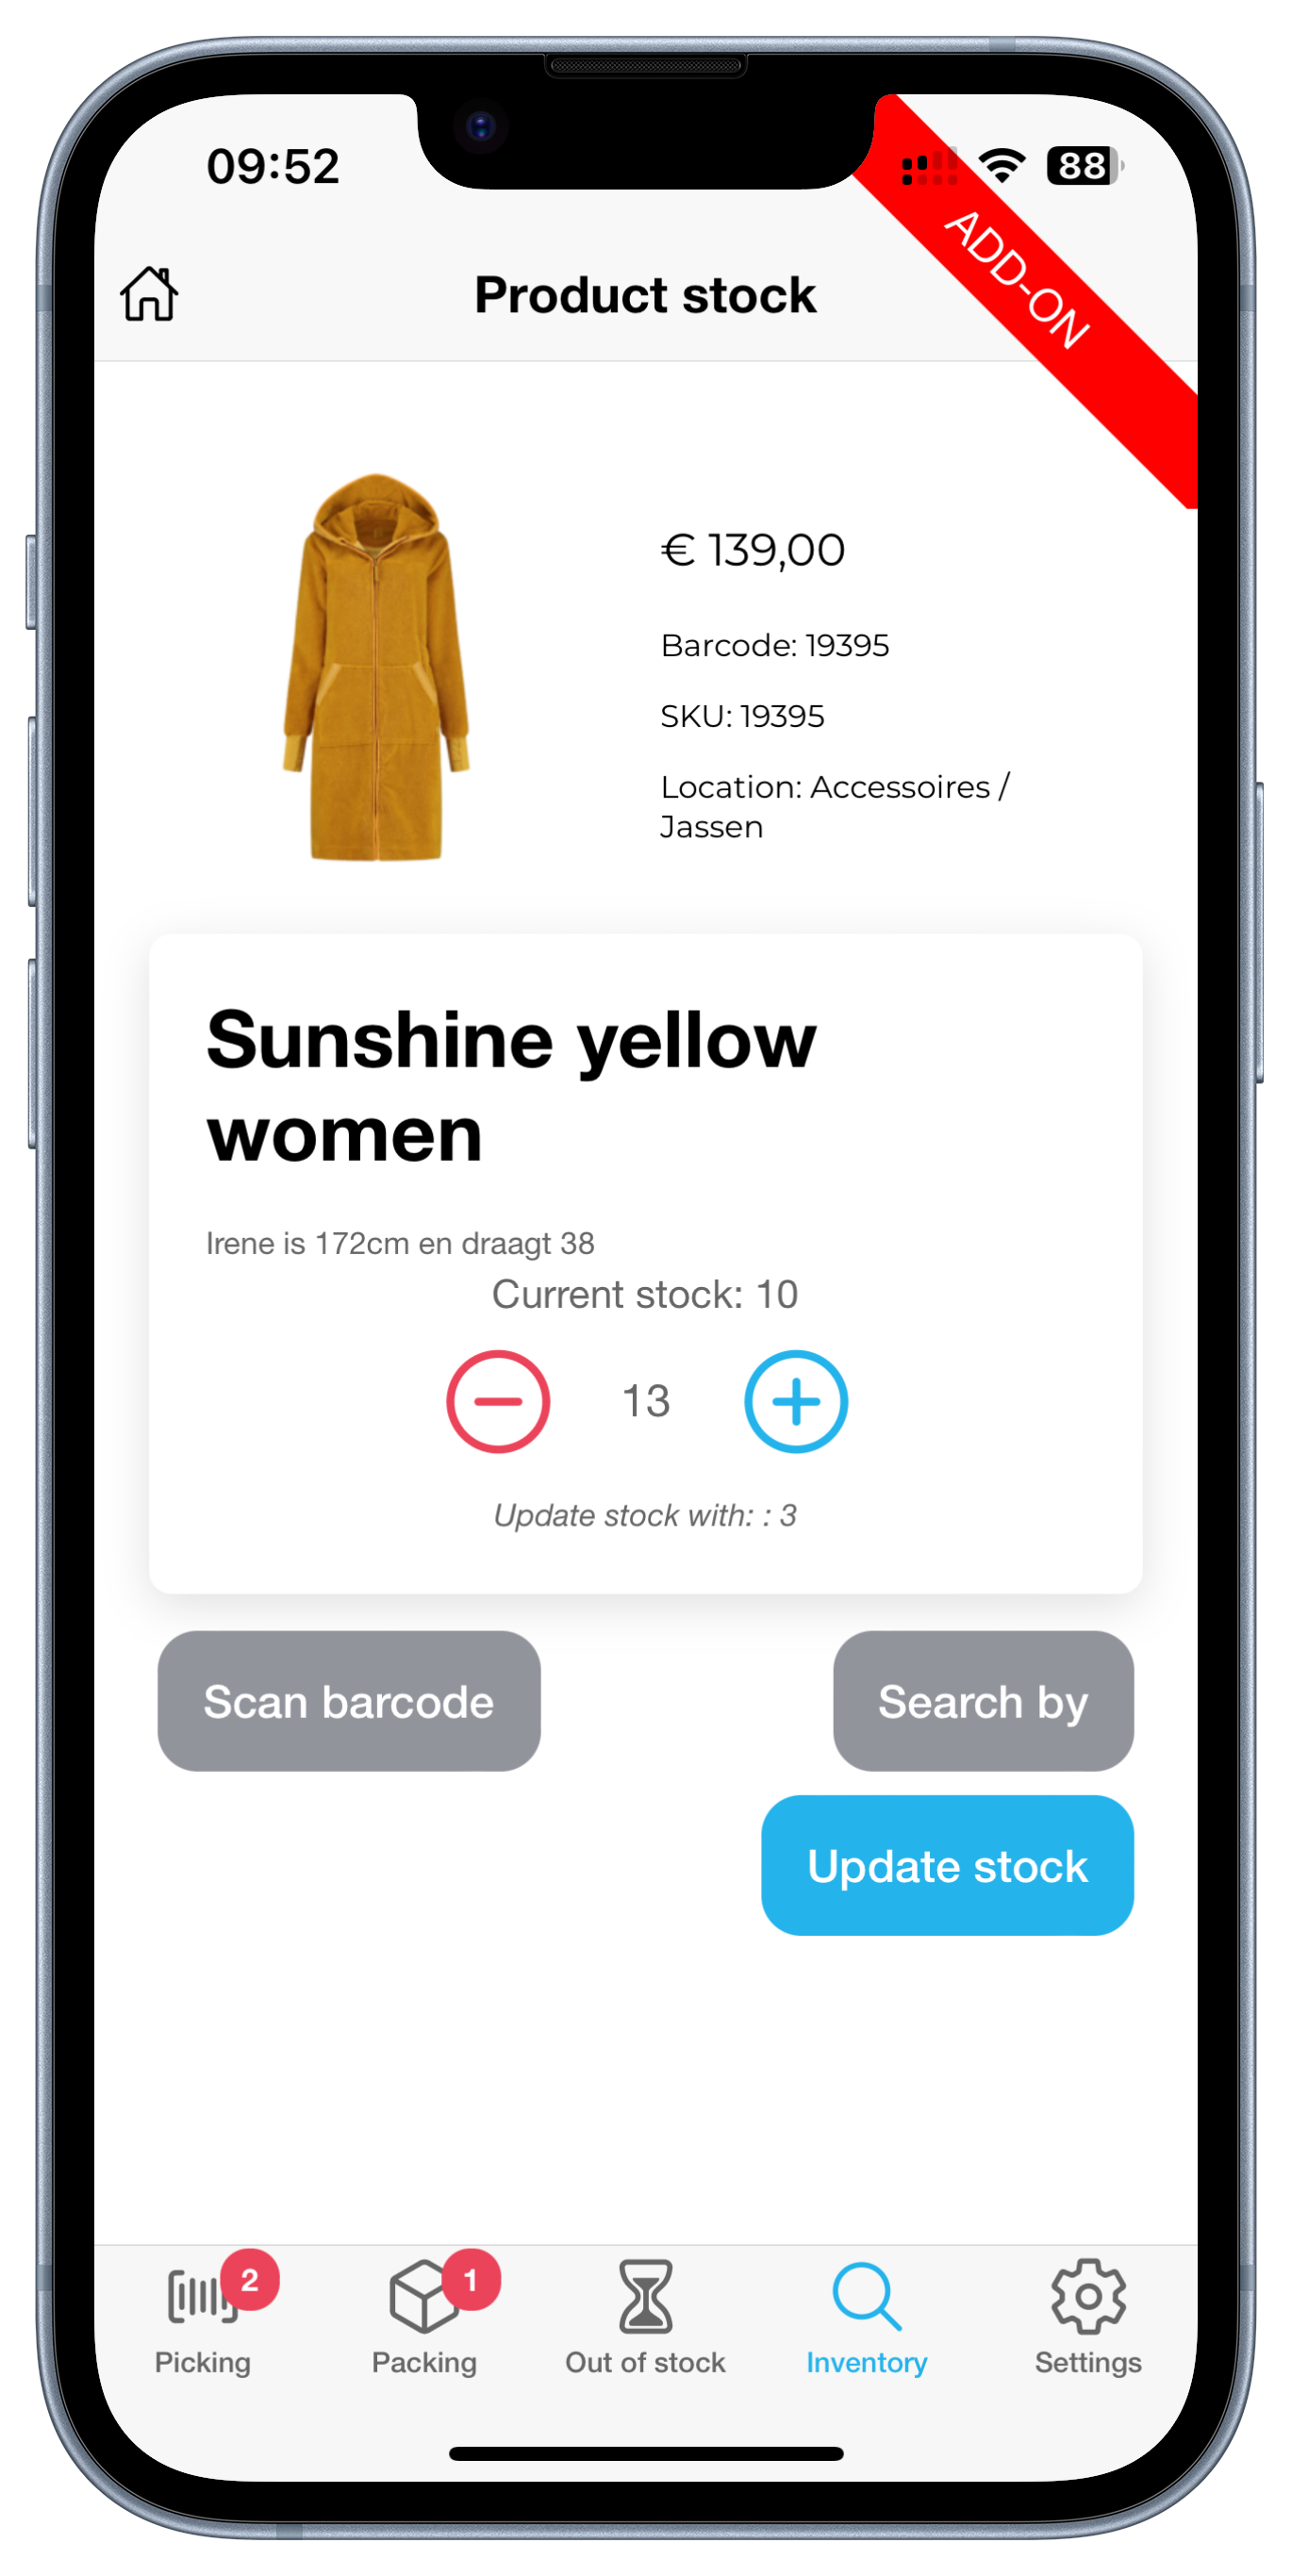
When you are order picking, you are already walking through the warehouse or the store. This is the perfect time to occasionally check the stock of a product. With the Inventory add-on we offer the option to scan the barcode or enter the sku/barcode (searching by product title is also possible for Woocommerce customers). We then retrieve the current stock of a product and this can be adjusted if necessary.
Inventory differences can be resolved during order picking. For example, consider products on a roll that are cut off during collection or to book new stock during a delivery.

Android
The Orderpicking App requires at least Android version 15 (Android 5.0 Lollipop) or higher.
This is not our own decision, but a requirement set by the Google Play Store. Google does not allow new apps or updates to be published for Android versions lower than 15. As a result, we are unable to make the app available for older devices.
We would love to support older versions, but publishing through the Play Store is technically not possible due to Google’s policies on security and compatibility.
Recommendation:
Please ensure your device runs Android 5.0 or newer. Most smartphones and tablets from the last few years already meet this requirement.
App
The Orderpicking App requires at least Android version 15 (Android 5.0 Lollipop) or higher.
This is not our own decision, but a requirement set by the Google Play Store. Google does not allow new apps or updates to be published for Android versions lower than 15. As a result, we are unable to make the app available for older devices.
We would love to support older versions, but publishing through the Play Store is technically not possible due to Google’s policies on security and compatibility.
Recommendation:
Please ensure your device runs Android 5.0 or newer. Most smartphones and tablets from the last few years already meet this requirement.
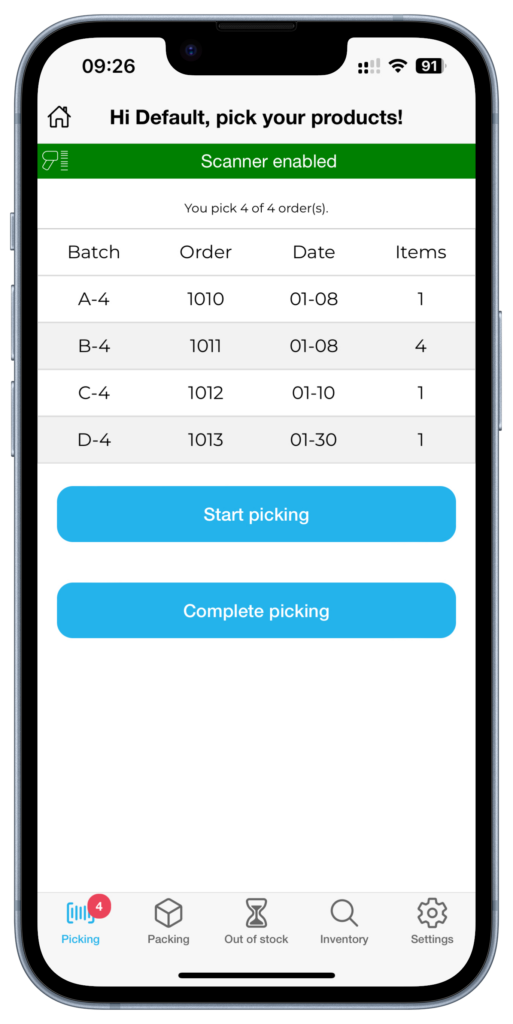
How to Set Up Batch Picking
1. Open App Settings Go to App Settings via My Account on orderpickingapp.com or in the WordPress plugin. Under the Picking Type setting, switch from Single Order Picking to Batch Picking. Save the settings and restart the app on your device.
2. Select a Picker and Orders In the app, select the picker who will be processing the orders. Optionally, enable the setting to manually choose which orders are included in the batch.
3. Start Picking
* If no orders have been claimed by the picker, the app will automatically load the oldest 5 open orders.
* Alternatively, you can select specific orders by scanning the order number or manually entering it.
You’ll now see the total number of orders in your batch. Tap Start Picking to begin the process.
Batch Picking
We’ll group orders into batches of 5 per picking run. Each bin on the cart should be labeled A, B, C, D, and E. When starting a picking run, you’ll receive a run number that applies to the entire cart (e.g. Run 31).
During picking, the first product may belong to multiple orders. In that case, the app will tell you which bin letter(s) to place the product in and how many units to pick for each.
Once all items have been picked, proceed to the packing screen. Here, you’ll see each order listed by its run number + bin letter (e.g. 31A, 31B, etc.). This allows you to match the picked items to the correct customer and prepare them for shipping.
o use the order picking app optimally with an external Bluetooth scanner and a keyboard, we recommend enabling the HiD Keyboard function on your scanner.
What does the HiD Keyboard function do?
This feature allows you to use both your keyboard and Bluetooth scanner simultaneously as input devices.
It’s ideal for situations where you need to alternate between entering data via the keyboard and scanning with the Bluetooth scanner.
What if my scanner doesn’t have a HiD Keyboard function?
If your scanner doesn’t support this function, you can only use one input device at a time.
This means you can either have the keyboard or the scanner active—but not both simultaneously.
Tip: Check your Bluetooth scanner’s manual to see how to enable the HiD Keyboard function.
It’s often easy to activate through a specific settings mode or by scanning a configuration code.
With the right settings, you can get the most out of your order picking app!
Do you need support or is there something you are missing? Then go to tickets in the My Account menu and leave your question. We try to address these as quickly as possible and provide an appropriate response.
Every webshop has it’s own way of connecting. For Woocommerce we use a custom plugin. Just search for the plugin Orderpicking App and you will find ours. Install, activate it and your almost done in WordPress. Go to our portal, login to your My Account and copy the API key and insert this in de WordPress plugin.
Sure, no problem. We get that we have to proof our self :-). You can try the Orderpicking App 30 days. Do you like it and is it working for your company, GREAT, then you start paying a little fee. Not that much if you see the benefits it brings to the table!
Processing your orders with our tool is a very computing intensive task and requires some serious GPU power to make it work. When we can provide a free service we gladly do and been doing this for a lot of users worldwide with our other apps but can’t in this case. However, we are sure you will be amazed by the time-saving and minimized number of mistakes. You can try the Orderpicking App 30 days for free.
BigCommerce
The Orderpicking App requires at least Android version 15 (Android 5.0 Lollipop) or higher.
This is not our own decision, but a requirement set by the Google Play Store. Google does not allow new apps or updates to be published for Android versions lower than 15. As a result, we are unable to make the app available for older devices.
We would love to support older versions, but publishing through the Play Store is technically not possible due to Google’s policies on security and compatibility.
Recommendation:
Please ensure your device runs Android 5.0 or newer. Most smartphones and tablets from the last few years already meet this requirement.
How to Set Up Batch Picking
1. Open App Settings Go to App Settings via My Account on orderpickingapp.com or in the WordPress plugin. Under the Picking Type setting, switch from Single Order Picking to Batch Picking. Save the settings and restart the app on your device.
2. Select a Picker and Orders In the app, select the picker who will be processing the orders. Optionally, enable the setting to manually choose which orders are included in the batch.
3. Start Picking
* If no orders have been claimed by the picker, the app will automatically load the oldest 5 open orders.
* Alternatively, you can select specific orders by scanning the order number or manually entering it.
You’ll now see the total number of orders in your batch. Tap Start Picking to begin the process.
Batch Picking
We’ll group orders into batches of 5 per picking run. Each bin on the cart should be labeled A, B, C, D, and E. When starting a picking run, you’ll receive a run number that applies to the entire cart (e.g. Run 31).
During picking, the first product may belong to multiple orders. In that case, the app will tell you which bin letter(s) to place the product in and how many units to pick for each.
Once all items have been picked, proceed to the packing screen. Here, you’ll see each order listed by its run number + bin letter (e.g. 31A, 31B, etc.). This allows you to match the picked items to the correct customer and prepare them for shipping.
Step 1 – Install the BigCommerce App
Log in to your BigCommerce store and navigate to the BigCommerce App Marketplace.
Search for Order Picking App and click Install.
After installation, open the app and choose to create a new account or log in to an existing Order Picking App account.
Step 2 – Create Your Order Picking App Account
You will be redirected to Orderpickingapp.com to complete your account setup.
Choose your preferred subscription plan to start your 30-day free trial. The trial period ends automatically and does not renew without your approval.
Fill in all required information, select BigCommerce as your platform, and create a password.
Once registration is complete, you will receive an email containing your account details. Keep this email in a safe place for future reference.
Step 3 – Connect BigCommerce
Return to your BigCommerce Admin Panel and open the Order Picking App.
Enter the API Key you received by email during registration.
Once the API key has been validated successfully, your BigCommerce store will be connected to Order Picking App and your orders will begin synchronizing automatically.
You can now configure your settings, upload your company logo, and customize the application according to your workflow.
If you have any questions, please contact us at support@orderpickingapp.com or via WhatsApp.
Step 4 – Install the Mobile App
Download the Order Picking App on your smartphone:
- Apple App Store (iPhone)
- Google Play Store (Android)
Search for Order Picking App and install the application.
Step 5 – Connect the Mobile App
Your webshop is now connected. The final step is linking the mobile app to your account.
In the BigCommerce Order Picking App dashboard, go to Settings and open your API Key (barcode + numbers).
Open the mobile app and tap Scan API Key. Your phone’s camera will open.
Scan the barcode and save the connection in the app.
Once the scan is completed successfully, the mobile app is connected to your account and you are ready to start picking orders.
o use the order picking app optimally with an external Bluetooth scanner and a keyboard, we recommend enabling the HiD Keyboard function on your scanner.
What does the HiD Keyboard function do?
This feature allows you to use both your keyboard and Bluetooth scanner simultaneously as input devices.
It’s ideal for situations where you need to alternate between entering data via the keyboard and scanning with the Bluetooth scanner.
What if my scanner doesn’t have a HiD Keyboard function?
If your scanner doesn’t support this function, you can only use one input device at a time.
This means you can either have the keyboard or the scanner active—but not both simultaneously.
Tip: Check your Bluetooth scanner’s manual to see how to enable the HiD Keyboard function.
It’s often easy to activate through a specific settings mode or by scanning a configuration code.
With the right settings, you can get the most out of your order picking app!
When you are order picking, you are already walking through the warehouse or the store. This is the perfect time to occasionally check the stock of a product. With the Inventory add-on we offer the option to scan the barcode or enter the sku/barcode (searching by product title is also possible for Woocommerce customers). We then retrieve the current stock of a product and this can be adjusted if necessary.
Inventory differences can be resolved during order picking. For example, consider products on a roll that are cut off during collection or to book new stock during a delivery.
Every shop has it’s own way of collecting orders. Some want to pick per order and others have multiple totes on a trolley. This is why we have the setting of the Order amount to pick at once.


When picking a single order you will start with the complete order list of open orders in the app. Here you can choose the order to pick.
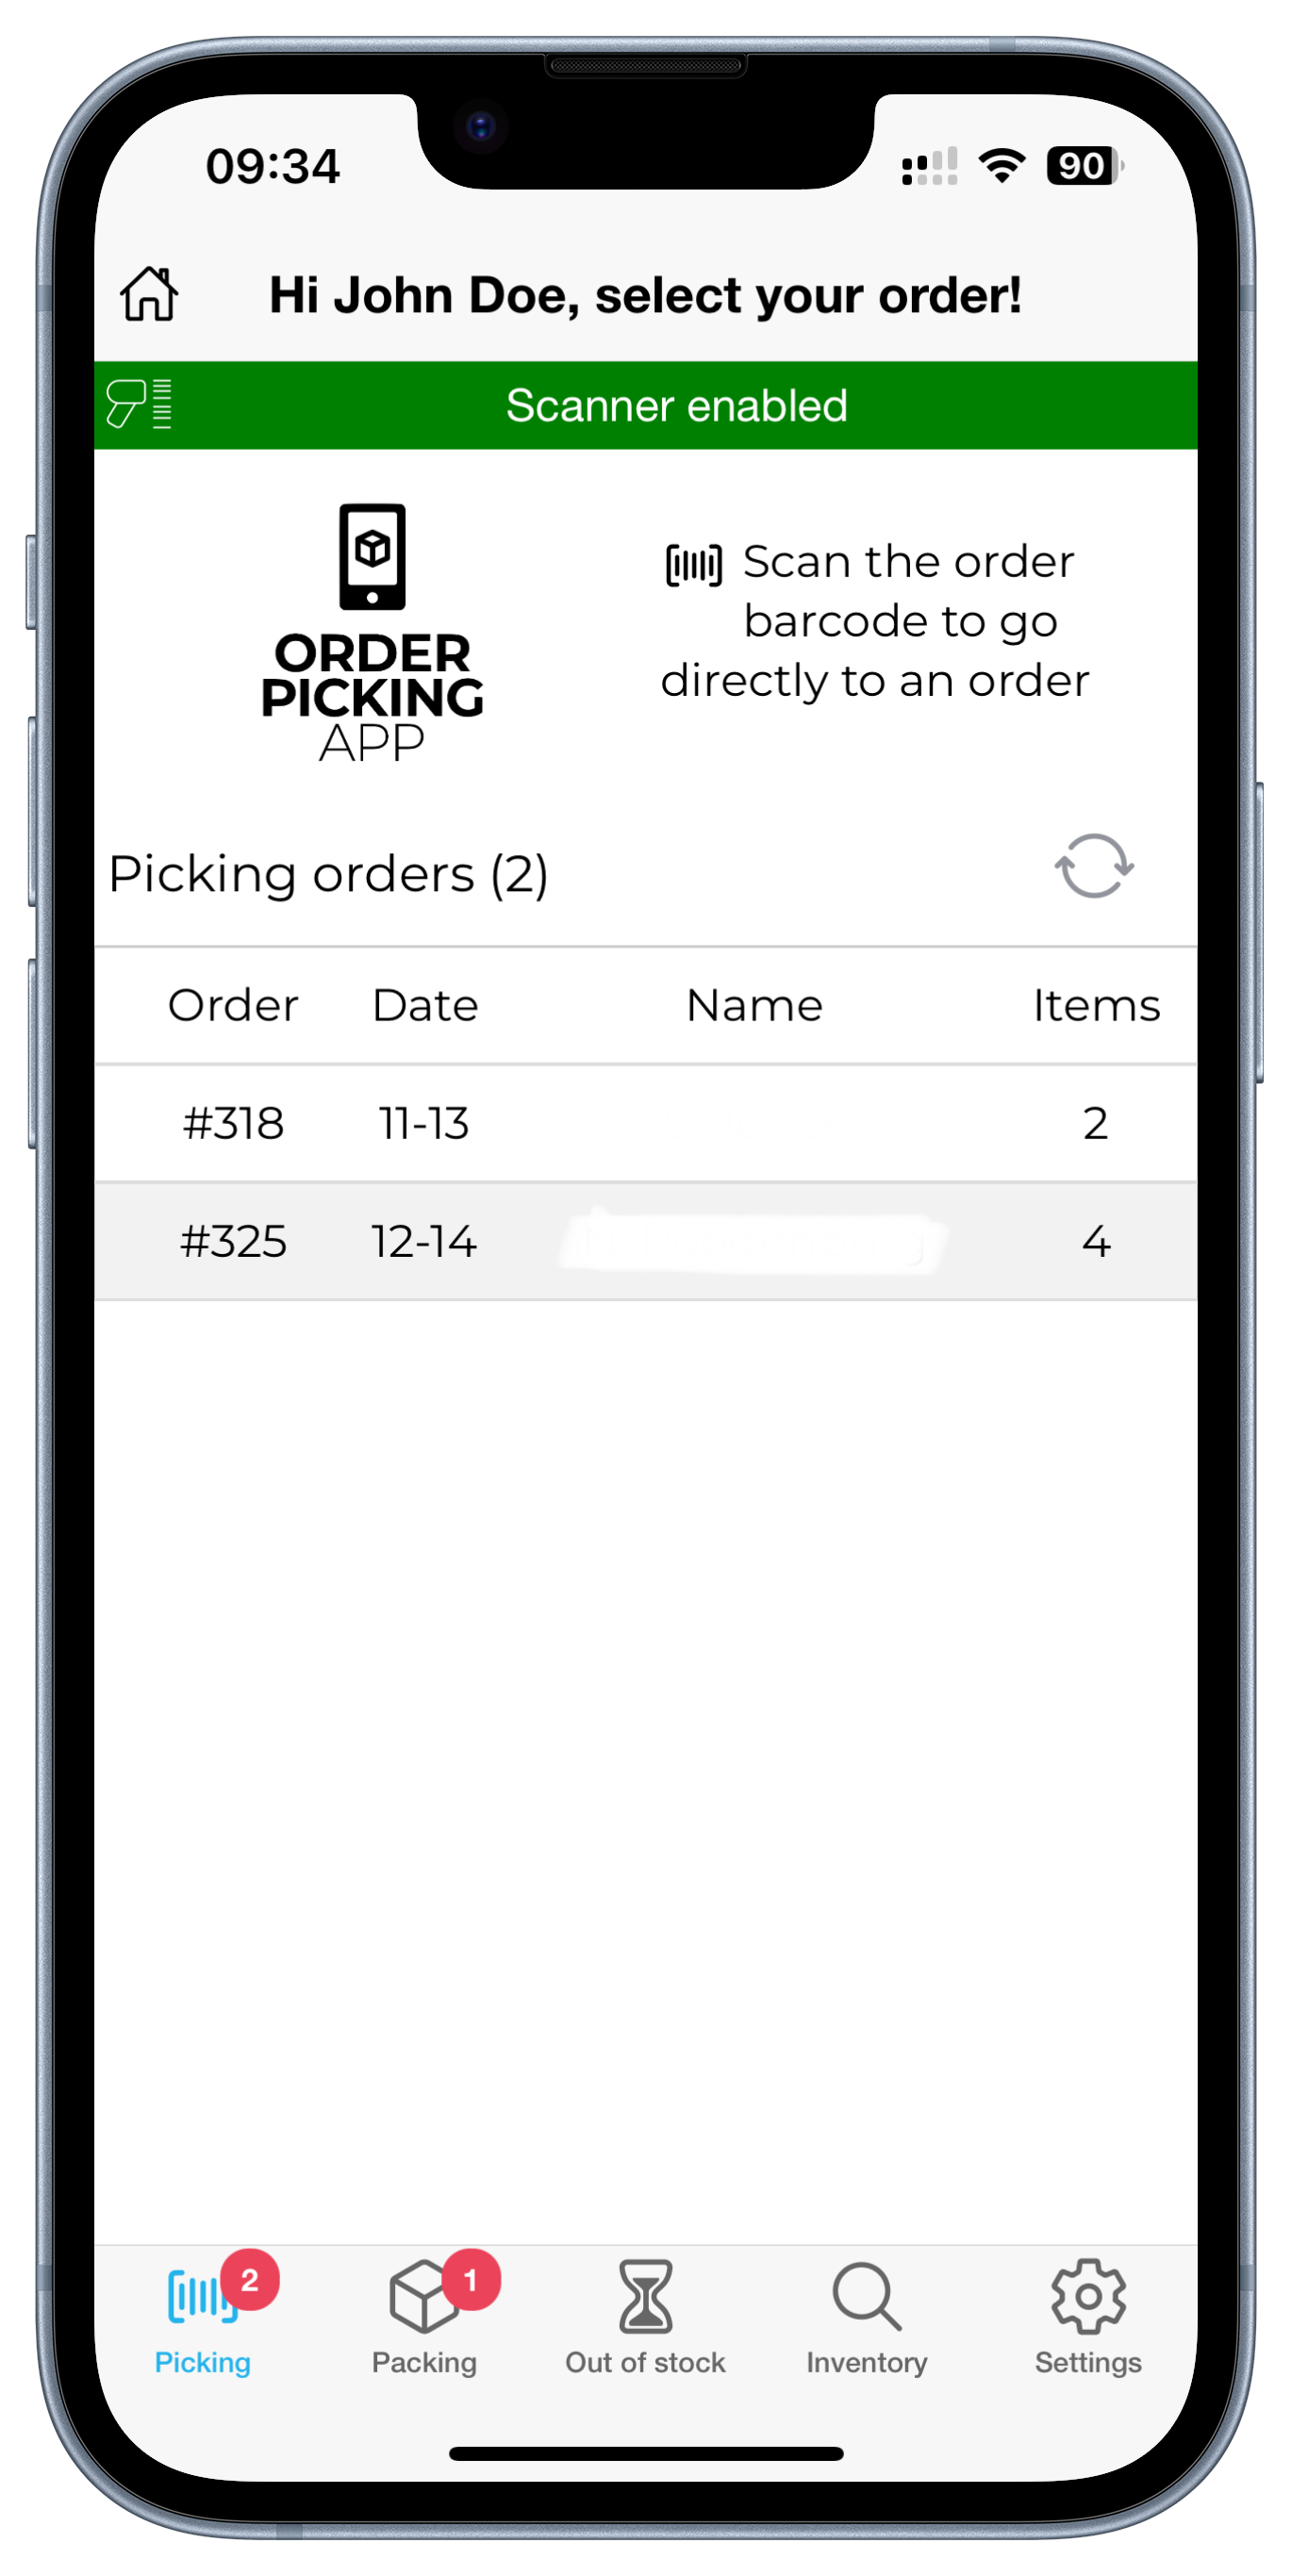
Single order picking
Batch picking
When selecting something other than single order we change the layout in the app a bit. If you have the option of 5 orders at once, we combine 5 orders in 1 picking-run. Each order will get a letter starting from A and a number (the batchnumber). These numbers will stick to the order true the whole process.
When batchpicking we will combine the orders so you will only stop at a product once (for multiple orders).
Batch picking orders

Batchpicking productscreen
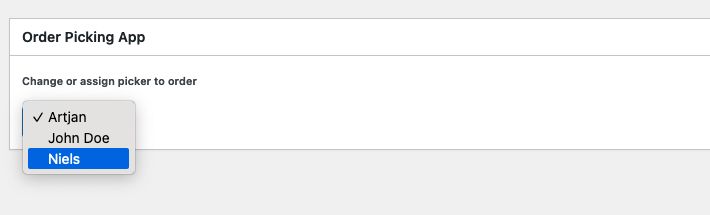
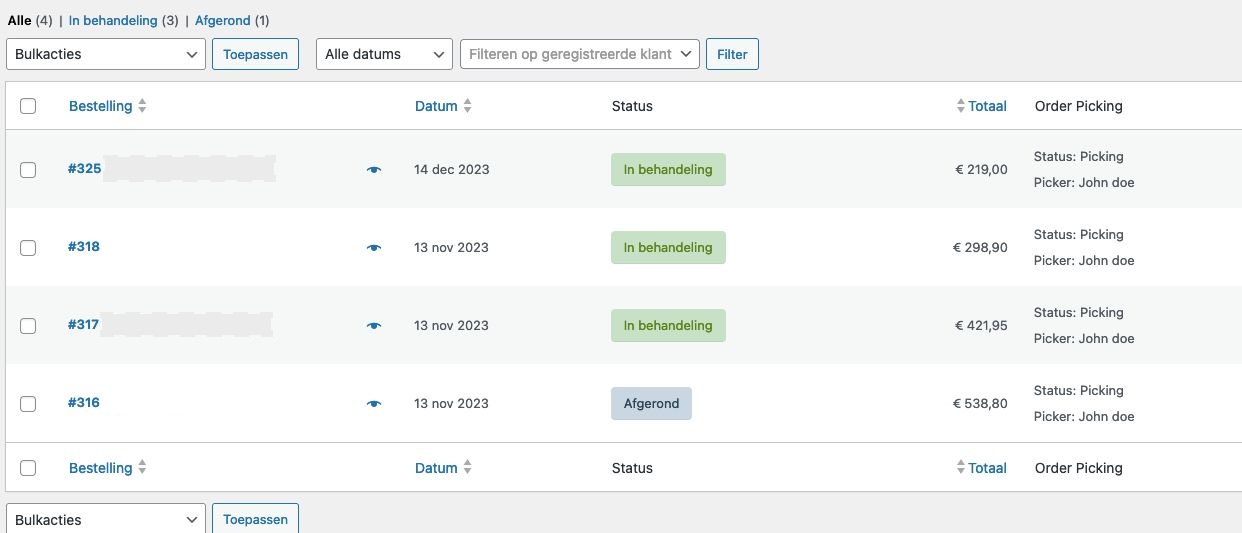
Yes you can, in Woocommerce. We build a column in the orderview of Woocommerce where you can see the picking status and assigned picker to a specific order. When opening an order, it is possible to pre-assign a picker.
Sure, no problem. We get that we have to proof our self :-). You can try the Orderpicking App 30 days. Do you like it and is it working for your company, GREAT, then you start paying a little fee. Not that much if you see the benefits it brings to the table!
Bugs
o use the order picking app optimally with an external Bluetooth scanner and a keyboard, we recommend enabling the HiD Keyboard function on your scanner.
What does the HiD Keyboard function do?
This feature allows you to use both your keyboard and Bluetooth scanner simultaneously as input devices.
It’s ideal for situations where you need to alternate between entering data via the keyboard and scanning with the Bluetooth scanner.
What if my scanner doesn’t have a HiD Keyboard function?
If your scanner doesn’t support this function, you can only use one input device at a time.
This means you can either have the keyboard or the scanner active—but not both simultaneously.
Tip: Check your Bluetooth scanner’s manual to see how to enable the HiD Keyboard function.
It’s often easy to activate through a specific settings mode or by scanning a configuration code.
With the right settings, you can get the most out of your order picking app!
Do you need support or is there something you are missing? Then go to tickets in the My Account menu and leave your question. We try to address these as quickly as possible and provide an appropriate response.
CCV Shop
The Orderpicking App requires at least Android version 15 (Android 5.0 Lollipop) or higher.
This is not our own decision, but a requirement set by the Google Play Store. Google does not allow new apps or updates to be published for Android versions lower than 15. As a result, we are unable to make the app available for older devices.
We would love to support older versions, but publishing through the Play Store is technically not possible due to Google’s policies on security and compatibility.
Recommendation:
Please ensure your device runs Android 5.0 or newer. Most smartphones and tablets from the last few years already meet this requirement.
How to Set Up Batch Picking
1. Open App Settings Go to App Settings via My Account on orderpickingapp.com or in the WordPress plugin. Under the Picking Type setting, switch from Single Order Picking to Batch Picking. Save the settings and restart the app on your device.
2. Select a Picker and Orders In the app, select the picker who will be processing the orders. Optionally, enable the setting to manually choose which orders are included in the batch.
3. Start Picking
* If no orders have been claimed by the picker, the app will automatically load the oldest 5 open orders.
* Alternatively, you can select specific orders by scanning the order number or manually entering it.
You’ll now see the total number of orders in your batch. Tap Start Picking to begin the process.
Batch Picking
We’ll group orders into batches of 5 per picking run. Each bin on the cart should be labeled A, B, C, D, and E. When starting a picking run, you’ll receive a run number that applies to the entire cart (e.g. Run 31).
During picking, the first product may belong to multiple orders. In that case, the app will tell you which bin letter(s) to place the product in and how many units to pick for each.
Once all items have been picked, proceed to the packing screen. Here, you’ll see each order listed by its run number + bin letter (e.g. 31A, 31B, etc.). This allows you to match the picked items to the correct customer and prepare them for shipping.
o use the order picking app optimally with an external Bluetooth scanner and a keyboard, we recommend enabling the HiD Keyboard function on your scanner.
What does the HiD Keyboard function do?
This feature allows you to use both your keyboard and Bluetooth scanner simultaneously as input devices.
It’s ideal for situations where you need to alternate between entering data via the keyboard and scanning with the Bluetooth scanner.
What if my scanner doesn’t have a HiD Keyboard function?
If your scanner doesn’t support this function, you can only use one input device at a time.
This means you can either have the keyboard or the scanner active—but not both simultaneously.
Tip: Check your Bluetooth scanner’s manual to see how to enable the HiD Keyboard function.
It’s often easy to activate through a specific settings mode or by scanning a configuration code.
With the right settings, you can get the most out of your order picking app!
Step 1
Go to https://www.orderpickingapp.com and choose Plans & Pricing (or the green button at the top right). Choose the right plan for the period after the 30 free trail days. We don’t extend the trail automatic .
Step 2
Enter all data, choose the desired platform of the webshop (CCV Shop) in the platform dropdown.
Step 3
After completing the order you will receive an email with the user details and the link of the my account on Orderpicking App.com to be able to log in immediately.
Step 4 CCV Shop
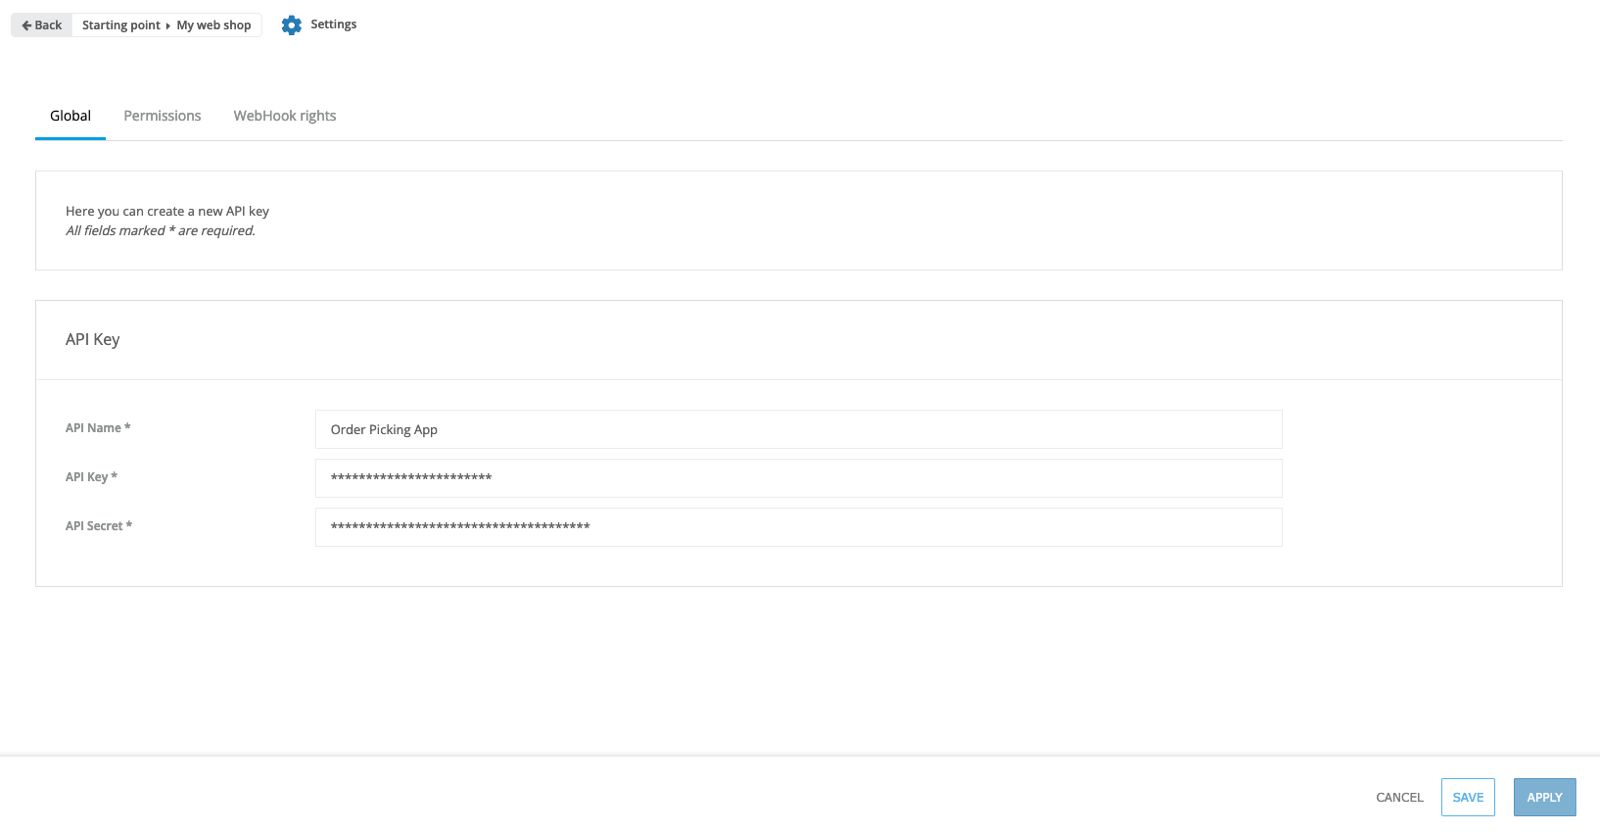
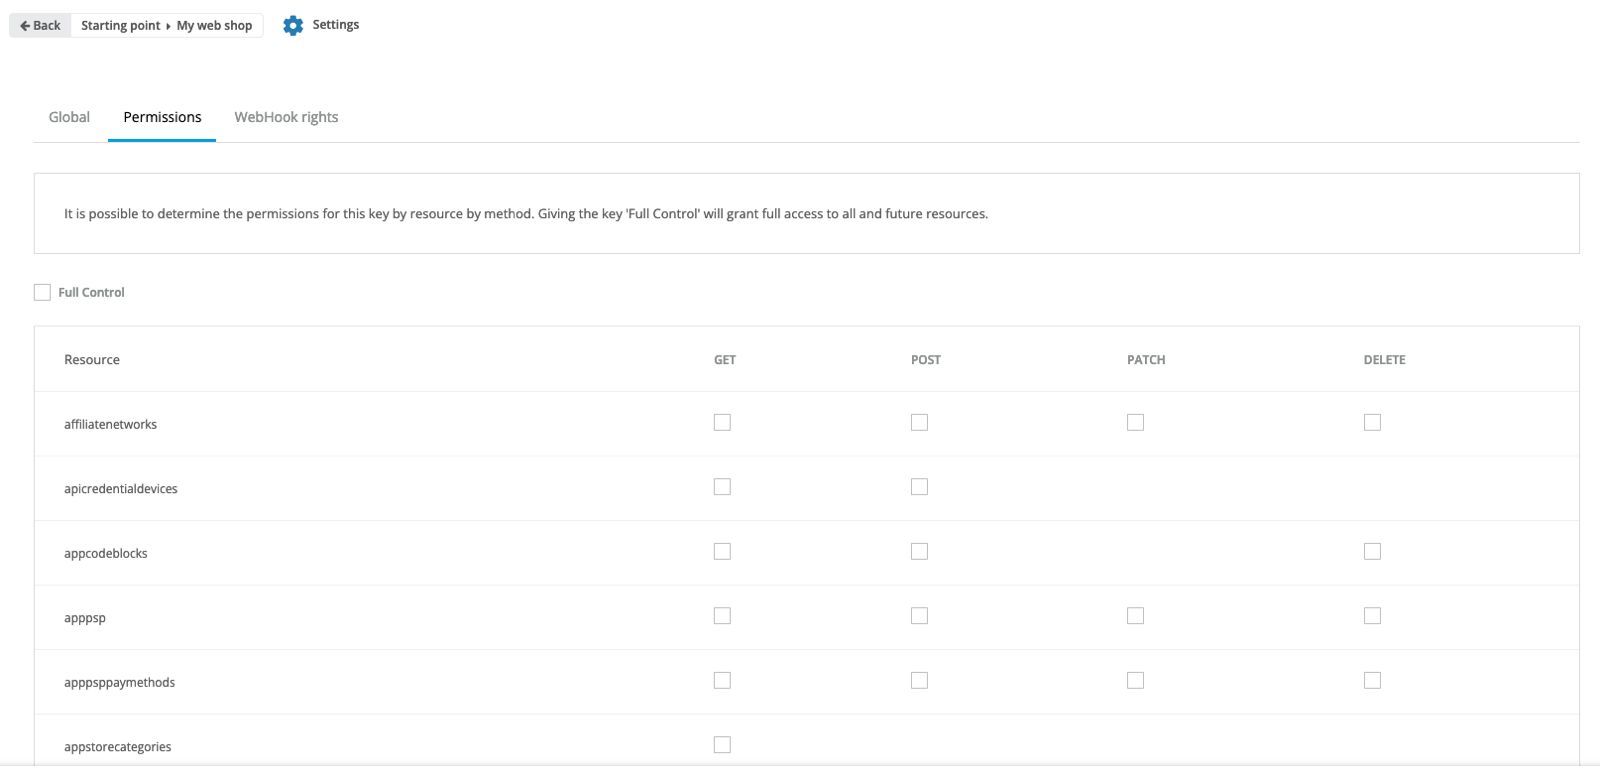
Go in the CCV Shop back office, open “Settings” page in the menu, and then choose “API Settings”. Give the API key an unique name and go the the tab Permissions. Change the permissions like this:
Name Method
categories GET
orders GET/POST
ordernotes GET/POST
orderrows GET
products GET/POST/PATCH
productvariations GET
Go back to the tab Global and copy the API key and API secret.
Step 5 MY ACCOUNT
- Copy the created API key and API Secret paste this in the MY ACCOUNT of the orderpickingapp.com settings page. Then Save
- Upload a company logo.
- Also choose here whether you pick per order or per x number of products. Leave your Picking Type empty and the app will show all orders/products to pick.
Step 6 APP INSTALL
Download the Orderpicking App on your phone. Go to the Apple App Store or the Google Play Store and search for Order Picking App
- Go to the Settings tab in My Account. Here is the API Key (Barcode + numbers).
- Open the app on the phone and press Scan API key. The phone’s camera opens.
- Scan the barcode and save it in the App. If all goes well, everything is now connected!
When you are order picking, you are already walking through the warehouse or the store. This is the perfect time to occasionally check the stock of a product. With the Inventory add-on we offer the option to scan the barcode or enter the sku/barcode (searching by product title is also possible for Woocommerce customers). We then retrieve the current stock of a product and this can be adjusted if necessary.
Inventory differences can be resolved during order picking. For example, consider products on a roll that are cut off during collection or to book new stock during a delivery.
Every shop has it’s own way of collecting orders. Some want to pick per order and others have multiple totes on a trolley. This is why we have the setting of the Order amount to pick at once.
When picking a single order you will start with the complete order list of open orders in the app. Here you can choose the order to pick.
Single order picking
Batch picking
When selecting something other than single order we change the layout in the app a bit. If you have the option of 5 orders at once, we combine 5 orders in 1 picking-run. Each order will get a letter starting from A and a number (the batchnumber). These numbers will stick to the order true the whole process.
When batchpicking we will combine the orders so you will only stop at a product once (for multiple orders).
Batch picking orders
Batchpicking productscreen
Sure, no problem. We get that we have to proof our self :-). You can try the Orderpicking App 30 days. Do you like it and is it working for your company, GREAT, then you start paying a little fee. Not that much if you see the benefits it brings to the table!
Processing your orders with our tool is a very computing intensive task and requires some serious GPU power to make it work. When we can provide a free service we gladly do and been doing this for a lot of users worldwide with our other apps but can’t in this case. However, we are sure you will be amazed by the time-saving and minimized number of mistakes. You can try the Orderpicking App 30 days for free.
Ecwid
The Orderpicking App requires at least Android version 15 (Android 5.0 Lollipop) or higher.
This is not our own decision, but a requirement set by the Google Play Store. Google does not allow new apps or updates to be published for Android versions lower than 15. As a result, we are unable to make the app available for older devices.
We would love to support older versions, but publishing through the Play Store is technically not possible due to Google’s policies on security and compatibility.
Recommendation:
Please ensure your device runs Android 5.0 or newer. Most smartphones and tablets from the last few years already meet this requirement.
How to Set Up Batch Picking
1. Open App Settings Go to App Settings via My Account on orderpickingapp.com or in the WordPress plugin. Under the Picking Type setting, switch from Single Order Picking to Batch Picking. Save the settings and restart the app on your device.
2. Select a Picker and Orders In the app, select the picker who will be processing the orders. Optionally, enable the setting to manually choose which orders are included in the batch.
3. Start Picking
* If no orders have been claimed by the picker, the app will automatically load the oldest 5 open orders.
* Alternatively, you can select specific orders by scanning the order number or manually entering it.
You’ll now see the total number of orders in your batch. Tap Start Picking to begin the process.
Batch Picking
We’ll group orders into batches of 5 per picking run. Each bin on the cart should be labeled A, B, C, D, and E. When starting a picking run, you’ll receive a run number that applies to the entire cart (e.g. Run 31).
During picking, the first product may belong to multiple orders. In that case, the app will tell you which bin letter(s) to place the product in and how many units to pick for each.
Once all items have been picked, proceed to the packing screen. Here, you’ll see each order listed by its run number + bin letter (e.g. 31A, 31B, etc.). This allows you to match the picked items to the correct customer and prepare them for shipping.
Step 1 Ecwid
Download the Orderpicking App from the Ecwid app store and install it. Choose to create a trail periode account on the app page.
Step 2 Orderpickingapp.com
You will be redirected to Orderpickingapp.com to choose your desired plan. This way you can start the 30 day free trail that will stop automaticly. Fill in all fields, choose the platform Ecwid and enter a password of your choosing. When you proceed, you will receive an email with your API key and password. Store this email in a save place for future use.
Step 3 Ecwid API key
Go back to Shopwired and open de Orderpicking App. Here your can enter the API key you received in the mail. If you have any questions here, please feel free to contact us via support@orderpickingapp.nl or Whatsapp.
Step 4 APP INSTALL
Download the Orderpicking App on your phone. Go to the Apple App Store or the Google Play Store and search for Order Picking App
Everything installed now. Only the connection between the app on the phone and the account is still necessary.
- Go to the App Settings tab in the Orderpickingapp.com / My Account. Here is the API Key (Barcode + numbers).
- Open the app on the phone and press Scan API key. The phone’s camera opens.
- Scan the barcode and save it in the App. If all goes well, everything is now connected!
o use the order picking app optimally with an external Bluetooth scanner and a keyboard, we recommend enabling the HiD Keyboard function on your scanner.
What does the HiD Keyboard function do?
This feature allows you to use both your keyboard and Bluetooth scanner simultaneously as input devices.
It’s ideal for situations where you need to alternate between entering data via the keyboard and scanning with the Bluetooth scanner.
What if my scanner doesn’t have a HiD Keyboard function?
If your scanner doesn’t support this function, you can only use one input device at a time.
This means you can either have the keyboard or the scanner active—but not both simultaneously.
Tip: Check your Bluetooth scanner’s manual to see how to enable the HiD Keyboard function.
It’s often easy to activate through a specific settings mode or by scanning a configuration code.
With the right settings, you can get the most out of your order picking app!
EKM
The Orderpicking App requires at least Android version 15 (Android 5.0 Lollipop) or higher.
This is not our own decision, but a requirement set by the Google Play Store. Google does not allow new apps or updates to be published for Android versions lower than 15. As a result, we are unable to make the app available for older devices.
We would love to support older versions, but publishing through the Play Store is technically not possible due to Google’s policies on security and compatibility.
Recommendation:
Please ensure your device runs Android 5.0 or newer. Most smartphones and tablets from the last few years already meet this requirement.
How to Set Up Batch Picking
1. Open App Settings Go to App Settings via My Account on orderpickingapp.com or in the WordPress plugin. Under the Picking Type setting, switch from Single Order Picking to Batch Picking. Save the settings and restart the app on your device.
2. Select a Picker and Orders In the app, select the picker who will be processing the orders. Optionally, enable the setting to manually choose which orders are included in the batch.
3. Start Picking
* If no orders have been claimed by the picker, the app will automatically load the oldest 5 open orders.
* Alternatively, you can select specific orders by scanning the order number or manually entering it.
You’ll now see the total number of orders in your batch. Tap Start Picking to begin the process.
Batch Picking
We’ll group orders into batches of 5 per picking run. Each bin on the cart should be labeled A, B, C, D, and E. When starting a picking run, you’ll receive a run number that applies to the entire cart (e.g. Run 31).
During picking, the first product may belong to multiple orders. In that case, the app will tell you which bin letter(s) to place the product in and how many units to pick for each.
Once all items have been picked, proceed to the packing screen. Here, you’ll see each order listed by its run number + bin letter (e.g. 31A, 31B, etc.). This allows you to match the picked items to the correct customer and prepare them for shipping.
Step 1 Create trail
Go to Orderpickingapp.com, select the 30-day trail and choose the EKM platform. When you proceed, you will receive an email with your API key and password. Store this email in a save place for future use.
Step 2 Connect with EKM
Go to the my account on orderpickingapp.com and choose ‘Connect with EKM’ . Go, in your my account page, to App settings to setup the Orderpicking App
Step 3 APP INSTALL
Download the Orderpicking App on your phone. Go to the Apple App Store or the Google Play Store and search for Order Picking App
Everything installed now. Only the connection between the app on the phone and the account is still necessary.
- Go to the App Settings tab in the Orderpickingapp.com / My Account. Here is the API Key (Barcode + numbers).
- Open the app on the phone and press Scan API key. The phone’s camera opens.
- Scan the barcode and save it in the App. If all goes well, everything is now connected!
o use the order picking app optimally with an external Bluetooth scanner and a keyboard, we recommend enabling the HiD Keyboard function on your scanner.
What does the HiD Keyboard function do?
This feature allows you to use both your keyboard and Bluetooth scanner simultaneously as input devices.
It’s ideal for situations where you need to alternate between entering data via the keyboard and scanning with the Bluetooth scanner.
What if my scanner doesn’t have a HiD Keyboard function?
If your scanner doesn’t support this function, you can only use one input device at a time.
This means you can either have the keyboard or the scanner active—but not both simultaneously.
Tip: Check your Bluetooth scanner’s manual to see how to enable the HiD Keyboard function.
It’s often easy to activate through a specific settings mode or by scanning a configuration code.
With the right settings, you can get the most out of your order picking app!
Etsy
The Orderpicking App requires at least Android version 15 (Android 5.0 Lollipop) or higher.
This is not our own decision, but a requirement set by the Google Play Store. Google does not allow new apps or updates to be published for Android versions lower than 15. As a result, we are unable to make the app available for older devices.
We would love to support older versions, but publishing through the Play Store is technically not possible due to Google’s policies on security and compatibility.
Recommendation:
Please ensure your device runs Android 5.0 or newer. Most smartphones and tablets from the last few years already meet this requirement.
How to Set Up Batch Picking
1. Open App Settings Go to App Settings via My Account on orderpickingapp.com or in the WordPress plugin. Under the Picking Type setting, switch from Single Order Picking to Batch Picking. Save the settings and restart the app on your device.
2. Select a Picker and Orders In the app, select the picker who will be processing the orders. Optionally, enable the setting to manually choose which orders are included in the batch.
3. Start Picking
* If no orders have been claimed by the picker, the app will automatically load the oldest 5 open orders.
* Alternatively, you can select specific orders by scanning the order number or manually entering it.
You’ll now see the total number of orders in your batch. Tap Start Picking to begin the process.
Batch Picking
We’ll group orders into batches of 5 per picking run. Each bin on the cart should be labeled A, B, C, D, and E. When starting a picking run, you’ll receive a run number that applies to the entire cart (e.g. Run 31).
During picking, the first product may belong to multiple orders. In that case, the app will tell you which bin letter(s) to place the product in and how many units to pick for each.
Once all items have been picked, proceed to the packing screen. Here, you’ll see each order listed by its run number + bin letter (e.g. 31A, 31B, etc.). This allows you to match the picked items to the correct customer and prepare them for shipping.
o use the order picking app optimally with an external Bluetooth scanner and a keyboard, we recommend enabling the HiD Keyboard function on your scanner.
What does the HiD Keyboard function do?
This feature allows you to use both your keyboard and Bluetooth scanner simultaneously as input devices.
It’s ideal for situations where you need to alternate between entering data via the keyboard and scanning with the Bluetooth scanner.
What if my scanner doesn’t have a HiD Keyboard function?
If your scanner doesn’t support this function, you can only use one input device at a time.
This means you can either have the keyboard or the scanner active—but not both simultaneously.
Tip: Check your Bluetooth scanner’s manual to see how to enable the HiD Keyboard function.
It’s often easy to activate through a specific settings mode or by scanning a configuration code.
With the right settings, you can get the most out of your order picking app!
Step 1
Go to https://www.orderpickingapp.com and choose Plans & Pricing (or the green button at the top right).
Step 2
Enter all data, choose the desired platform of the webshop (Etsy)
Step 3
After completing the order you will receive an email with the user details and the link of the account to be able to log in immediately.
Step 4 MY ACCOUNT
- Login to your My Account > and go to App Settings. Choose your shop
- When you want to connect to your Etsy shop press the green button > Connect with Etsy
- Follow the steps to make a successful connection.
Step 5 APP INSTALL
Download the Orderpicking App on your phone. Go to the Apple App Store or the Google Play Store and search for Order Picking App
- Go to the Settings tab in My Account. Here is the API Key (Barcode + numbers).
- Open the app on the phone and press Scan API key. The phone’s camera opens.
- Scan the barcode and save it in the App. If all goes well, everything is now connected!
Every shop has it’s own way of collecting orders. Some want to pick per order and others have multiple totes on a trolley. This is why we have the setting of the Order amount to pick at once.
When picking a single order you will start with the complete order list of open orders in the app. Here you can choose the order to pick.
Single order picking
Batch picking
When selecting something other than single order we change the layout in the app a bit. If you have the option of 5 orders at once, we combine 5 orders in 1 picking-run. Each order will get a letter starting from A and a number (the batchnumber). These numbers will stick to the order true the whole process.
When batchpicking we will combine the orders so you will only stop at a product once (for multiple orders).
Batch picking orders
Batchpicking productscreen
Sure, no problem. We get that we have to proof our self :-). You can try the Orderpicking App 30 days. Do you like it and is it working for your company, GREAT, then you start paying a little fee. Not that much if you see the benefits it brings to the table!
Processing your orders with our tool is a very computing intensive task and requires some serious GPU power to make it work. When we can provide a free service we gladly do and been doing this for a lot of users worldwide with our other apps but can’t in this case. However, we are sure you will be amazed by the time-saving and minimized number of mistakes. You can try the Orderpicking App 30 days for free.
Exact
Step 1: Connect with Exact Online
- Log in to the License Portal.
- Go to My Account and click on Connect with Exact Online.
- You will be redirected to Exact Online. Log in with your account details.
- Approve the required permissions to establish the connection.
- Select the correct division/administration you want to use.
After this step, the connection between Exact Online and the Orderpicking platform is active.
Step 2: Install the Orderpicking App
- Download the Orderpicking App on your phone:
- Apple iPhone/iPad: Go to the Apple App Store and search for Order Picking App.
- Android devices: Go to the Google Play Store and search for Order Picking App.
- Install the app on your device.
Step 3: Connect the App with Your Account
After installation, the app still needs to be linked to your Orderpicking account.
- In the BigCommerce Orderpicking App, open the Settings tab.
- Here you will find the API Key (shown as barcode + numbers).
- Open the Orderpicking App on your phone and press Scan API key.
- Your phone’s camera will open automatically.
- Scan the barcode displayed in the Settings tab.
- Save the connection in the app.
If everything is correct, the app is now successfully connected to your account.
The Orderpicking App requires at least Android version 15 (Android 5.0 Lollipop) or higher.
This is not our own decision, but a requirement set by the Google Play Store. Google does not allow new apps or updates to be published for Android versions lower than 15. As a result, we are unable to make the app available for older devices.
We would love to support older versions, but publishing through the Play Store is technically not possible due to Google’s policies on security and compatibility.
Recommendation:
Please ensure your device runs Android 5.0 or newer. Most smartphones and tablets from the last few years already meet this requirement.
How to Set Up Batch Picking
1. Open App Settings Go to App Settings via My Account on orderpickingapp.com or in the WordPress plugin. Under the Picking Type setting, switch from Single Order Picking to Batch Picking. Save the settings and restart the app on your device.
2. Select a Picker and Orders In the app, select the picker who will be processing the orders. Optionally, enable the setting to manually choose which orders are included in the batch.
3. Start Picking
* If no orders have been claimed by the picker, the app will automatically load the oldest 5 open orders.
* Alternatively, you can select specific orders by scanning the order number or manually entering it.
You’ll now see the total number of orders in your batch. Tap Start Picking to begin the process.
Batch Picking
We’ll group orders into batches of 5 per picking run. Each bin on the cart should be labeled A, B, C, D, and E. When starting a picking run, you’ll receive a run number that applies to the entire cart (e.g. Run 31).
During picking, the first product may belong to multiple orders. In that case, the app will tell you which bin letter(s) to place the product in and how many units to pick for each.
Once all items have been picked, proceed to the packing screen. Here, you’ll see each order listed by its run number + bin letter (e.g. 31A, 31B, etc.). This allows you to match the picked items to the correct customer and prepare them for shipping.
o use the order picking app optimally with an external Bluetooth scanner and a keyboard, we recommend enabling the HiD Keyboard function on your scanner.
What does the HiD Keyboard function do?
This feature allows you to use both your keyboard and Bluetooth scanner simultaneously as input devices.
It’s ideal for situations where you need to alternate between entering data via the keyboard and scanning with the Bluetooth scanner.
What if my scanner doesn’t have a HiD Keyboard function?
If your scanner doesn’t support this function, you can only use one input device at a time.
This means you can either have the keyboard or the scanner active—but not both simultaneously.
Tip: Check your Bluetooth scanner’s manual to see how to enable the HiD Keyboard function.
It’s often easy to activate through a specific settings mode or by scanning a configuration code.
With the right settings, you can get the most out of your order picking app!
When you are order picking, you are already walking through the warehouse or the store. This is the perfect time to occasionally check the stock of a product. With the Inventory add-on we offer the option to scan the barcode or enter the sku/barcode (searching by product title is also possible for Woocommerce customers). We then retrieve the current stock of a product and this can be adjusted if necessary.
Inventory differences can be resolved during order picking. For example, consider products on a roll that are cut off during collection or to book new stock during a delivery.
Every shop has it’s own way of collecting orders. Some want to pick per order and others have multiple totes on a trolley. This is why we have the setting of the Order amount to pick at once.
When picking a single order you will start with the complete order list of open orders in the app. Here you can choose the order to pick.
Single order picking
Batch picking
When selecting something other than single order we change the layout in the app a bit. If you have the option of 5 orders at once, we combine 5 orders in 1 picking-run. Each order will get a letter starting from A and a number (the batchnumber). These numbers will stick to the order true the whole process.
When batchpicking we will combine the orders so you will only stop at a product once (for multiple orders).
Batch picking orders
Batchpicking productscreen
IdoSell
Step 1 IdoSell
Download the Orderpicking App from the IdoSell app store and install it. Choose your trail period of 30 days.
Step 2 Settingspage
- Upload a company logo.
- Also choose here whether you pick per order or per x number of orders. [We advice to start picking per order (SINGLE)]
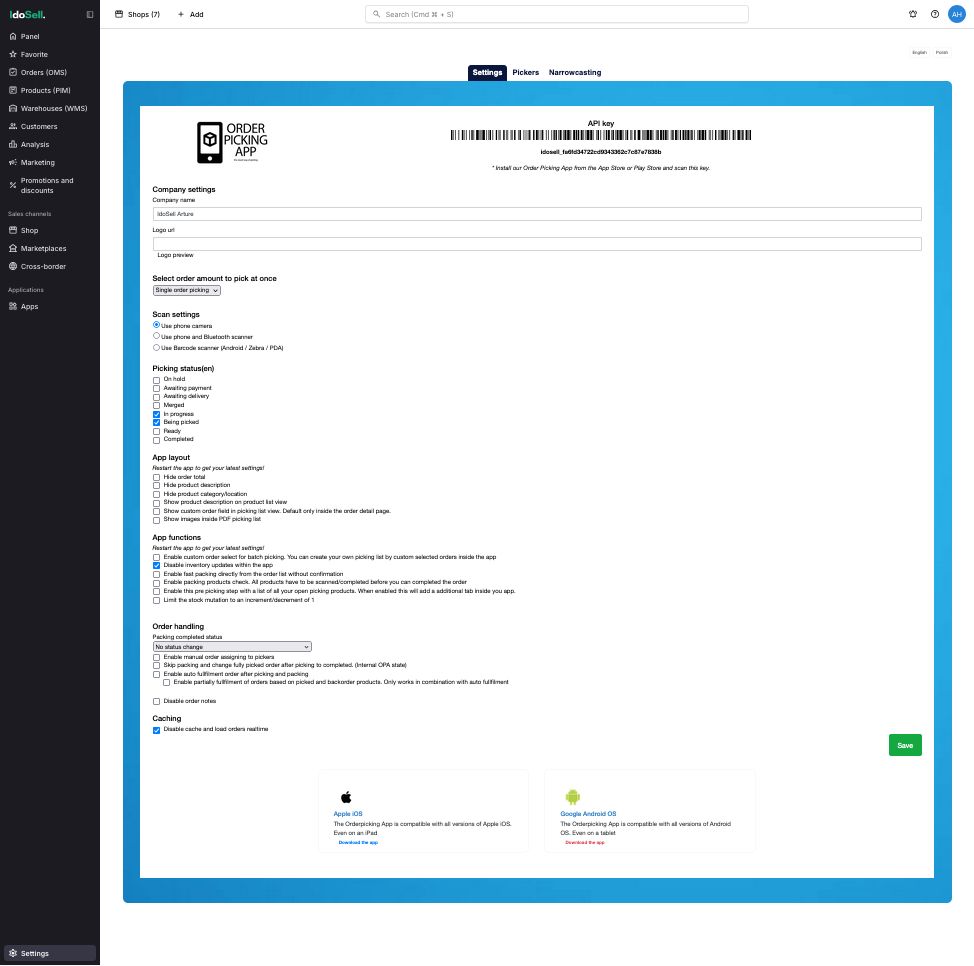
Step 3 APP INSTALL
Download the Orderpicking App on your phone. Go to the Apple App Store or the Google Play Store and search for Order Picking App
Everything installed now. Only the connection between the app on the phone and the account is still necessary.
- Go to the Settings tab in My Environment. Here is the API Key (Barcode + numbers).
- Open the app on the phone and press Scan API key. The phone’s camera opens.
- Scan the barcode and save it in the App. If all goes well, everything is now connected!
The Orderpicking App requires at least Android version 15 (Android 5.0 Lollipop) or higher.
This is not our own decision, but a requirement set by the Google Play Store. Google does not allow new apps or updates to be published for Android versions lower than 15. As a result, we are unable to make the app available for older devices.
We would love to support older versions, but publishing through the Play Store is technically not possible due to Google’s policies on security and compatibility.
Recommendation:
Please ensure your device runs Android 5.0 or newer. Most smartphones and tablets from the last few years already meet this requirement.
How to Set Up Batch Picking
1. Open App Settings Go to App Settings via My Account on orderpickingapp.com or in the WordPress plugin. Under the Picking Type setting, switch from Single Order Picking to Batch Picking. Save the settings and restart the app on your device.
2. Select a Picker and Orders In the app, select the picker who will be processing the orders. Optionally, enable the setting to manually choose which orders are included in the batch.
3. Start Picking
* If no orders have been claimed by the picker, the app will automatically load the oldest 5 open orders.
* Alternatively, you can select specific orders by scanning the order number or manually entering it.
You’ll now see the total number of orders in your batch. Tap Start Picking to begin the process.
Batch Picking
We’ll group orders into batches of 5 per picking run. Each bin on the cart should be labeled A, B, C, D, and E. When starting a picking run, you’ll receive a run number that applies to the entire cart (e.g. Run 31).
During picking, the first product may belong to multiple orders. In that case, the app will tell you which bin letter(s) to place the product in and how many units to pick for each.
Once all items have been picked, proceed to the packing screen. Here, you’ll see each order listed by its run number + bin letter (e.g. 31A, 31B, etc.). This allows you to match the picked items to the correct customer and prepare them for shipping.
o use the order picking app optimally with an external Bluetooth scanner and a keyboard, we recommend enabling the HiD Keyboard function on your scanner.
What does the HiD Keyboard function do?
This feature allows you to use both your keyboard and Bluetooth scanner simultaneously as input devices.
It’s ideal for situations where you need to alternate between entering data via the keyboard and scanning with the Bluetooth scanner.
What if my scanner doesn’t have a HiD Keyboard function?
If your scanner doesn’t support this function, you can only use one input device at a time.
This means you can either have the keyboard or the scanner active—but not both simultaneously.
Tip: Check your Bluetooth scanner’s manual to see how to enable the HiD Keyboard function.
It’s often easy to activate through a specific settings mode or by scanning a configuration code.
With the right settings, you can get the most out of your order picking app!
When you are order picking, you are already walking through the warehouse or the store. This is the perfect time to occasionally check the stock of a product. With the Inventory add-on we offer the option to scan the barcode or enter the sku/barcode (searching by product title is also possible for Woocommerce customers). We then retrieve the current stock of a product and this can be adjusted if necessary.
Inventory differences can be resolved during order picking. For example, consider products on a roll that are cut off during collection or to book new stock during a delivery.
Every shop has it’s own way of collecting orders. Some want to pick per order and others have multiple totes on a trolley. This is why we have the setting of the Order amount to pick at once.
When picking a single order you will start with the complete order list of open orders in the app. Here you can choose the order to pick.
Single order picking
Batch picking
When selecting something other than single order we change the layout in the app a bit. If you have the option of 5 orders at once, we combine 5 orders in 1 picking-run. Each order will get a letter starting from A and a number (the batchnumber). These numbers will stick to the order true the whole process.
When batchpicking we will combine the orders so you will only stop at a product once (for multiple orders).
Batch picking orders
Batchpicking productscreen
Install
Step 1 – Mijnwebwinkel
Log in to your Mijnwebwinkel account and navigate to:
Settings → Add-ons & Modules → Integrations & Connections
Click Add Token and select Order Picking App as the integration partner. Then click Save.
After saving, click Show Token to display the generated token. Copy this token, as you will need it to connect your webshop to Order Picking App.
Step 2 – Orderpickingapp.com
Go to Orderpickingapp.com and create an account or log in to your existing account.
Choose your preferred subscription plan to start your 30-day free trial. The trial period ends automatically and does not renew without your approval.
Fill in all required details, select Mijnwebwinkel as your platform, and create a password. Once registration is complete, you will receive an email containing your account details. Keep this email in a safe place for future reference.
Step 3 – Connect Mijnwebwinkel to Order Picking App
Open the settings page of your Order Picking App account.
Paste the token you copied from Mijnwebwinkel into the designated field and save your settings.
Order Picking App will automatically validate the connection through the Mijnwebwinkel API. Once the validation is successful, your webshop is connected and your orders will start synchronizing automatically.
Step 4 – Install the Mobile App
Download the Order Picking App on your smartphone:
- Apple App Store (iPhone)
- Google Play Store (Android)
Search for Order Picking App and install the application.
Step 5 – Connect the Mobile App
Your webshop is now connected. The final step is linking the mobile app to your account.
In the Order Picking App dashboard, go to Settings and open your API Key (barcode + numbers).
Open the mobile app and tap Scan API Key. Your phone’s camera will open.
Scan the barcode and save the connection in the app.
Once the scan is completed successfully, the mobile app is connected to your account and you are ready to start picking orders.
Step 1: Connect with Exact Online
- Log in to the License Portal.
- Go to My Account and click on Connect with Exact Online.
- You will be redirected to Exact Online. Log in with your account details.
- Approve the required permissions to establish the connection.
- Select the correct division/administration you want to use.
After this step, the connection between Exact Online and the Orderpicking platform is active.
Step 2: Install the Orderpicking App
- Download the Orderpicking App on your phone:
- Apple iPhone/iPad: Go to the Apple App Store and search for Order Picking App.
- Android devices: Go to the Google Play Store and search for Order Picking App.
- Install the app on your device.
Step 3: Connect the App with Your Account
After installation, the app still needs to be linked to your Orderpicking account.
- In the BigCommerce Orderpicking App, open the Settings tab.
- Here you will find the API Key (shown as barcode + numbers).
- Open the Orderpicking App on your phone and press Scan API key.
- Your phone’s camera will open automatically.
- Scan the barcode displayed in the Settings tab.
- Save the connection in the app.
If everything is correct, the app is now successfully connected to your account.
Step 1 Create trail
Go to Orderpickingapp.com, select the 30-day trail and choose the EKM platform. When you proceed, you will receive an email with your API key and password. Store this email in a save place for future use.
Step 2 Connect with EKM
Go to the my account on orderpickingapp.com and choose ‘Connect with EKM’ . Go, in your my account page, to App settings to setup the Orderpicking App
Step 3 APP INSTALL
Download the Orderpicking App on your phone. Go to the Apple App Store or the Google Play Store and search for Order Picking App
Everything installed now. Only the connection between the app on the phone and the account is still necessary.
- Go to the App Settings tab in the Orderpickingapp.com / My Account. Here is the API Key (Barcode + numbers).
- Open the app on the phone and press Scan API key. The phone’s camera opens.
- Scan the barcode and save it in the App. If all goes well, everything is now connected!
Step 1 Ecwid
Download the Orderpicking App from the Ecwid app store and install it. Choose to create a trail periode account on the app page.
Step 2 Orderpickingapp.com
You will be redirected to Orderpickingapp.com to choose your desired plan. This way you can start the 30 day free trail that will stop automaticly. Fill in all fields, choose the platform Ecwid and enter a password of your choosing. When you proceed, you will receive an email with your API key and password. Store this email in a save place for future use.
Step 3 Ecwid API key
Go back to Shopwired and open de Orderpicking App. Here your can enter the API key you received in the mail. If you have any questions here, please feel free to contact us via support@orderpickingapp.nl or Whatsapp.
Step 4 APP INSTALL
Download the Orderpicking App on your phone. Go to the Apple App Store or the Google Play Store and search for Order Picking App
Everything installed now. Only the connection between the app on the phone and the account is still necessary.
- Go to the App Settings tab in the Orderpickingapp.com / My Account. Here is the API Key (Barcode + numbers).
- Open the app on the phone and press Scan API key. The phone’s camera opens.
- Scan the barcode and save it in the App. If all goes well, everything is now connected!
Step 1 Shopwired
Download the Orderpicking App from the Shopwired app store and install it. Choose to create a trail periode account on the app page.

Step 2 Orderpickingapp.com
You will be redirected to Orderpickingapp.com to choose your desired plan. This way you can start the 30 day free trail that will stop automaticly. Fill in all fields, choose the platform Shopwired and enter a password of your choosing. When you proceed, you will receive an email with your API key and password. Store this email in a save place for future use.
Step 3 Shopwired API key
Go back to Shopwired and open de Orderpicking App. Here your can enter the API key you received in the mail. If you have any questions here, please feel free to contact us via support@orderpickingapp.nl or Whatsapp.
Step 4 APP INSTALL
Download the Orderpicking App on your phone. Go to the Apple App Store or the Google Play Store and search for Order Picking App
Everything installed now. Only the connection between the app on the phone and the account is still necessary.
- Go to the App Settings tab in the Orderpickingapp.com / My Account. Here is the API Key (Barcode + numbers).
- Open the app on the phone and press Scan API key. The phone’s camera opens.
- Scan the barcode and save it in the App. If all goes well, everything is now connected!
Once you’ve started the trial, installed the plugin, and downloaded the app, everything should normally function as expected. However, it seems the issue you’re encountering is that the webshop isn’t connecting to the Orderpicking App portal.
If you’re using the Force Login plugin, this could be the cause—it’s likely blocking the REST API connection required for communication between the webshop and our app.
To resolve this, please add the following code to your functions.php file:
function opa_remove_force_login_rest_block() {
    remove_filter( 'rest_authentication_errors', 'v_forcelogin_rest_access', 99 );
}
add_action( 'after_setup_theme', 'opa_remove_force_login_rest_block' );
This snippet disables the restriction imposed by the Force Login plugin on REST API requests, restoring the necessary communication with our portal.
Let us know if the issue persists after applying this fix!
Step 1
Go to https://www.orderpickingapp.com and choose Plans & Pricing (or the green button at the top right).
Step 2
Enter all data, choose the desired platform of the webshop (Selro)
Step 3
After completing the order you will receive an email with the user details and the link of the account to be able to log in immediately.
Step 4 SELRO
Create an API key with a secret in your Selro account.
By default API will be disabled on your account. To enable the API please send an email to support@selro.com. Once the API is enabled, you can access the keys by going into Settings -> Channel Integration -> API.
Step 5 MY ACCOUNT
Login at orderpickingapp.com/my-account and go to APP SETTINGS. Choose the shop and go to the settings tab.
- Copy the API key and Secret in the desired box
- Fill in all other settings and pickers.

Step 6 APP INSTALL
Download the Orderpicking App on your phone. Go to the Apple App Store or the Google Play Store and search for Order Picking App
- Go to the Settings tab in My Account. Here is the API Key (Barcode + numbers).
- Open the app on the phone and press Scan API key. The phone’s camera opens.
- Scan the barcode and save it in the App. If all goes well, everything is now connected!
Step 1 – Install the BigCommerce App
Log in to your BigCommerce store and navigate to the BigCommerce App Marketplace.
Search for Order Picking App and click Install.
After installation, open the app and choose to create a new account or log in to an existing Order Picking App account.
Step 2 – Create Your Order Picking App Account
You will be redirected to Orderpickingapp.com to complete your account setup.
Choose your preferred subscription plan to start your 30-day free trial. The trial period ends automatically and does not renew without your approval.
Fill in all required information, select BigCommerce as your platform, and create a password.
Once registration is complete, you will receive an email containing your account details. Keep this email in a safe place for future reference.
Step 3 – Connect BigCommerce
Return to your BigCommerce Admin Panel and open the Order Picking App.
Enter the API Key you received by email during registration.
Once the API key has been validated successfully, your BigCommerce store will be connected to Order Picking App and your orders will begin synchronizing automatically.
You can now configure your settings, upload your company logo, and customize the application according to your workflow.
If you have any questions, please contact us at support@orderpickingapp.com or via WhatsApp.
Step 4 – Install the Mobile App
Download the Order Picking App on your smartphone:
- Apple App Store (iPhone)
- Google Play Store (Android)
Search for Order Picking App and install the application.
Step 5 – Connect the Mobile App
Your webshop is now connected. The final step is linking the mobile app to your account.
In the BigCommerce Order Picking App dashboard, go to Settings and open your API Key (barcode + numbers).
Open the mobile app and tap Scan API Key. Your phone’s camera will open.
Scan the barcode and save the connection in the app.
Once the scan is completed successfully, the mobile app is connected to your account and you are ready to start picking orders.
Step 1
Go to https://www.orderpickingapp.com and choose Plans & Pricing (or the green button at the top right). Choose the right plan for the period after the 30 free trail days. We don’t extend the trail automatic .
Step 2
Enter all data, choose the desired platform of the webshop (CCV Shop) in the platform dropdown.
Step 3
After completing the order you will receive an email with the user details and the link of the my account on Orderpicking App.com to be able to log in immediately.
Step 4 CCV Shop
Go in the CCV Shop back office, open “Settings” page in the menu, and then choose “API Settings”. Give the API key an unique name and go the the tab Permissions. Change the permissions like this:
Name Method
categories GET
orders GET/POST
ordernotes GET/POST
orderrows GET
products GET/POST/PATCH
productvariations GET
Go back to the tab Global and copy the API key and API secret.
Step 5 MY ACCOUNT
- Copy the created API key and API Secret paste this in the MY ACCOUNT of the orderpickingapp.com settings page. Then Save
- Upload a company logo.
- Also choose here whether you pick per order or per x number of products. Leave your Picking Type empty and the app will show all orders/products to pick.
Step 6 APP INSTALL
Download the Orderpicking App on your phone. Go to the Apple App Store or the Google Play Store and search for Order Picking App
- Go to the Settings tab in My Account. Here is the API Key (Barcode + numbers).
- Open the app on the phone and press Scan API key. The phone’s camera opens.
- Scan the barcode and save it in the App. If all goes well, everything is now connected!
Step 1 Wix
Download the Orderpicking App from the Wix app store and install it. Choose your trail period of 30 days.
Step 2 MY ACCOUNT
- Upload a company logo.
- Also choose here whether you pick per order or per x number of products. Leave your Picking Type empty and the app will show all orders/products to pick.
Step 3 APP INSTALL
Download the Orderpicking App on your phone. Go to the Apple App Store or the Google Play Store and search for Order Picking App
Everything installed now. Only the connection between the app on the phone and the account is still necessary.
- Go to the Settings tab in the Wix Orderpicking App. Here is the API Key (Barcode + numbers).
- Open the app on the phone and press Scan API key. The phone’s camera opens.
- Scan the barcode and save it in the App. If all goes well, everything is now connected!
Step 1
Go to https://www.orderpickingapp.com and choose Plans & Pricing (or the green button at the top right).
Step 2
Enter all data, choose the desired platform of the webshop (Prestashop)
Step 3
After completing the order you will receive an email with the user details and the link of the account to be able to log in immediately.
Step 4 PRESTASHOP
Check if this in activate: mod_auth_basic on your hosting or server
Go in the PrestaShop back office, open the “Web service” page under the “Advanced Parameters” menu, and then choose “Yes” for the “Enable PrestaShop Webservice” option. In order to have access to the API you need to create an access key, this will allow you to finely tune the permissions you give to the different data of your shop. You will use this key later in each call to the API. Open the “Webservice” page under the “Advanced Parameters” menu, and then click the “Add new webservice key” button to access the account configuration section.
GET Permissions
1. orders
2. order_states
3. categories
4. products
5. stocks
6. carriers
7. stock_availables
8. customers
PUT
1. orders
2. stock_availables
Step 5 MY ACCOUNT
- Copy the created WEBSERVICE KEY and paste this in the MY ACCOUNT of the orderpickingapp.com settings page. Then Save
- Upload a company logo.
- Also choose here whether you pick per order or per x number of products. Leave your Picking Type empty and the app will show all orders/products to pick.
Step 6 APP INSTALL
Download the Orderpicking App on your phone. Go to the Apple App Store or the Google Play Store and search for Order Picking App
- Go to the Settings tab in My Account. Here is the API Key (Barcode + numbers).
- Open the app on the phone and press Scan API key. The phone’s camera opens.
- Scan the barcode and save it in the App. If all goes well, everything is now connected!
Step 1 SHOPIFY
Download the Orderpicking App from the Shopify app store and install it. Choose your trail period of 30 days.
Step 2 MY ACCOUNT
- Upload a company logo.
- Also choose here whether you pick per order or per x number of products. Leave your Picking Type empty and the app will show all orders/products to pick.
Step 3 APP INSTALL
Download the Orderpicking App on your phone. Go to the Apple App Store or the Google Play Store and search for Order Picking App
Everything installed now. Only the connection between the app on the phone and the account is still necessary.
- Go to the Settings tab in My Environment. Here is the API Key (Barcode + numbers).
- Open the app on the phone and press Scan API key. The phone’s camera opens.
- Scan the barcode and save it in the App. If all goes well, everything is now connected!
Step 1
Go to https://www.orderpickingapp.com and choose Plans & Pricing (or the green button at the top right).
Step 2
Enter all data, choose the desired platform of the webshop (Woocommerce)
Step 3
After completing the order you will receive an email with the user details and the link of the account to be able to log in immediately.
Step 4 WORDPRESS
Download the plugin for Woocommerce, go to the admin part of your website, go to Plugin, Add new plugin, at the top: Upload plugin, install and activate it. Copy and insert the API Key in your plugin. You can find the key in your My Account at orderpickingapp.com
Step 5 MY ACCOUNT
Upload a company logo. Choose here whether you pick per order or per x number of products. Leave your Picking Type empty and the app will show all orders/products to pick.
Step 6 APP
Download the Orderpicking App on your phone. Go to the Appstore or the Google Play store and search for Order Picking App
Everything installed now. Only the connection between the app on the phone and the account is still necessary. Go to the Settings tab in My Account. Here is the API Key (Barcode + numbers). Open the app on the phone and press Scan API key. The phone’s camera opens. Scan the barcode and save it in the App. If all goes well, everything is now connected!
Every webshop has it’s own way of connecting. For Woocommerce we use a custom plugin. Just search for the plugin Orderpicking App and you will find ours. Install, activate it and your almost done in WordPress. Go to our portal, login to your My Account and copy the API key and insert this in de WordPress plugin.
Magento
The Orderpicking App requires at least Android version 15 (Android 5.0 Lollipop) or higher.
This is not our own decision, but a requirement set by the Google Play Store. Google does not allow new apps or updates to be published for Android versions lower than 15. As a result, we are unable to make the app available for older devices.
We would love to support older versions, but publishing through the Play Store is technically not possible due to Google’s policies on security and compatibility.
Recommendation:
Please ensure your device runs Android 5.0 or newer. Most smartphones and tablets from the last few years already meet this requirement.
How to Set Up Batch Picking
1. Open App Settings Go to App Settings via My Account on orderpickingapp.com or in the WordPress plugin. Under the Picking Type setting, switch from Single Order Picking to Batch Picking. Save the settings and restart the app on your device.
2. Select a Picker and Orders In the app, select the picker who will be processing the orders. Optionally, enable the setting to manually choose which orders are included in the batch.
3. Start Picking
* If no orders have been claimed by the picker, the app will automatically load the oldest 5 open orders.
* Alternatively, you can select specific orders by scanning the order number or manually entering it.
You’ll now see the total number of orders in your batch. Tap Start Picking to begin the process.
Batch Picking
We’ll group orders into batches of 5 per picking run. Each bin on the cart should be labeled A, B, C, D, and E. When starting a picking run, you’ll receive a run number that applies to the entire cart (e.g. Run 31).
During picking, the first product may belong to multiple orders. In that case, the app will tell you which bin letter(s) to place the product in and how many units to pick for each.
Once all items have been picked, proceed to the packing screen. Here, you’ll see each order listed by its run number + bin letter (e.g. 31A, 31B, etc.). This allows you to match the picked items to the correct customer and prepare them for shipping.
Step 1
Go to https://www.orderpickingapp.com and choose Plans & Pricing (or the green button at the top right).
Step 2
Enter all data, choose the desired platform of the webshop (Magento)
Step 3
After completing the order you will receive an email with the user details and the link of the account to be able to log in immediately into the My account.
Step 4 Magento
Go in your Magento account to System > Extensions> Integration
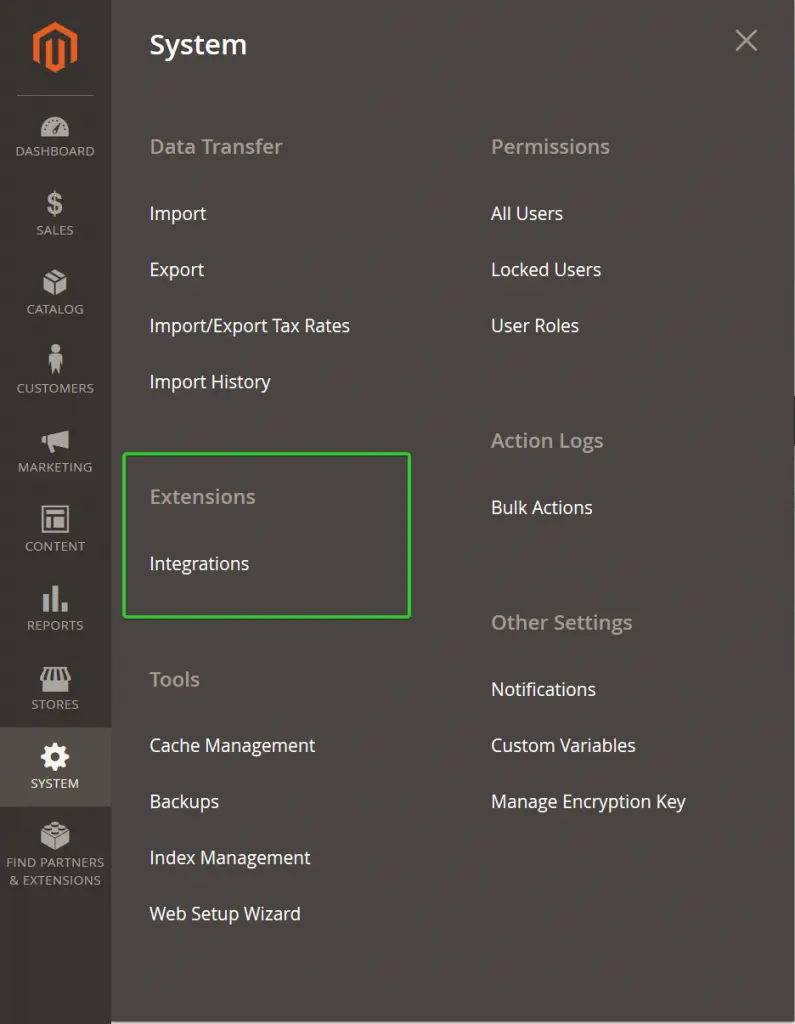
Click add new integration to open a new integration form
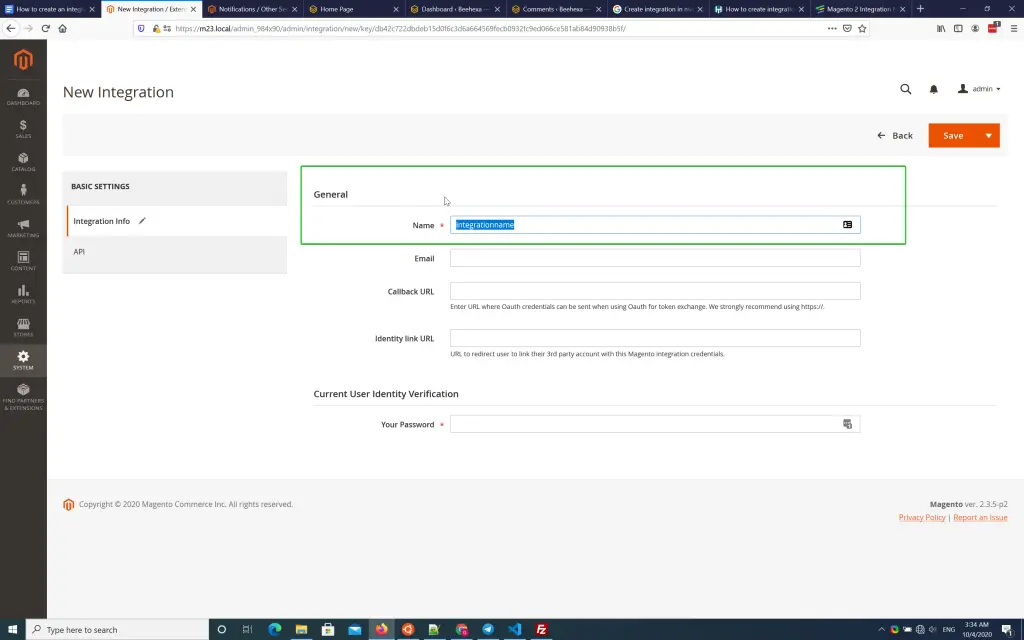
Enter the integration name as the form in the above picture.
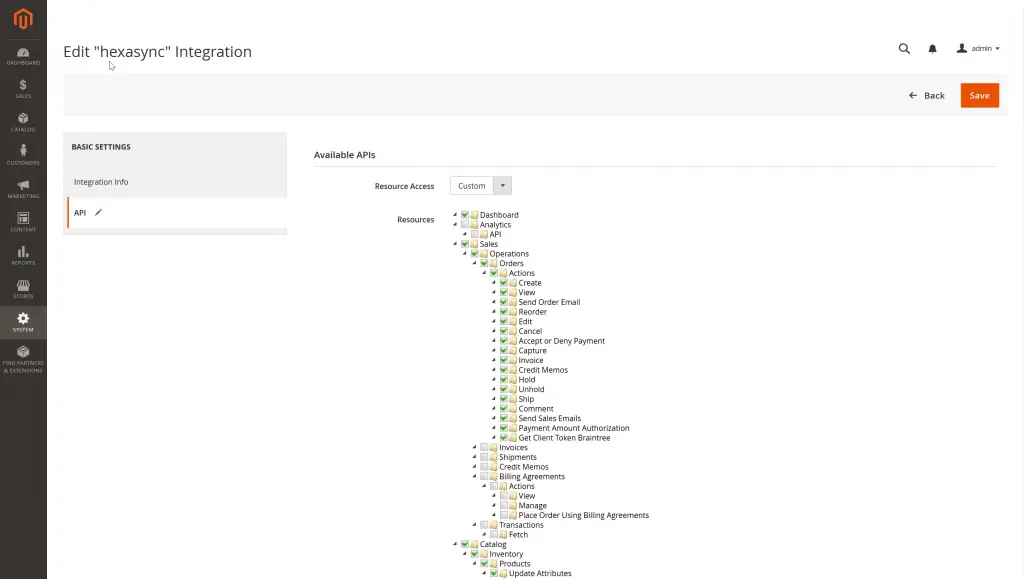
Grant access to the API resources
- Sales
- Catalog
Save to create a new consumer public & secret keys for integration.
Activate integration for creating an access token for the external application.
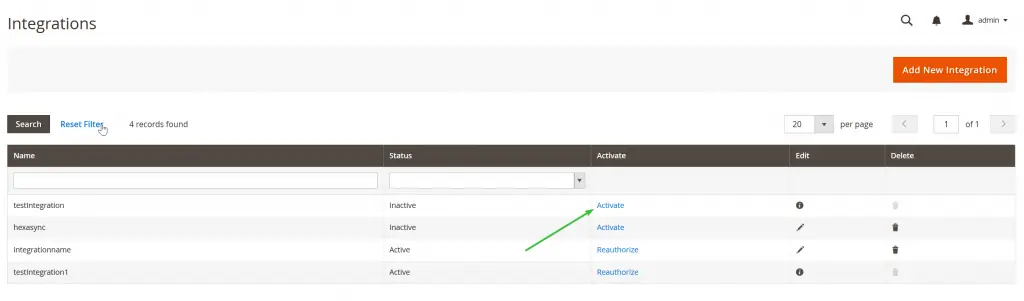
After activating, we can see the integration detail in the picture below.
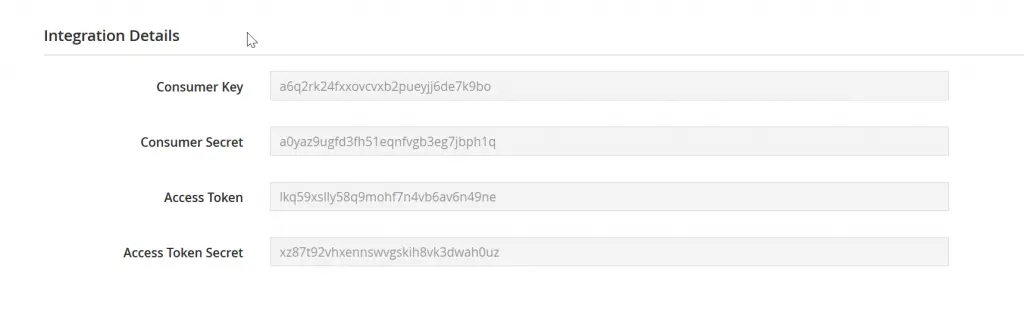
Copy the Access Token and go to the next step
Step 5 MY ACCOUNT on Orderpicking App.com
Login with the credentials provided in your email and go to your My account. Click on the tab App Settings and then on your tile (with the plan name in it). This is the place where you can upload or change your settings for the app.
Paste the Access Token into the field
Upload a company logo. Choose here whether you pick per order or per x number of products. Leave your Picking Type empty and the app will show all orders/products to pick. Enter your Pickernames, create a picking route and set everything to your liking.
Save everything
Step 6 APP
Download the Orderpicking App on your phone. Go to the Appstore or the Google Play store and search for Order Picking App
Everything installed now. Only the connection between the app on the phone and the account is still necessary. Go to the Settings tab in My Account. Here is the API Key (Barcode + numbers). Open the app on the phone and press Scan API key. The phone’s camera opens. Scan the barcode and save it in the App. If all goes well, everything is now connected!
o use the order picking app optimally with an external Bluetooth scanner and a keyboard, we recommend enabling the HiD Keyboard function on your scanner.
What does the HiD Keyboard function do?
This feature allows you to use both your keyboard and Bluetooth scanner simultaneously as input devices.
It’s ideal for situations where you need to alternate between entering data via the keyboard and scanning with the Bluetooth scanner.
What if my scanner doesn’t have a HiD Keyboard function?
If your scanner doesn’t support this function, you can only use one input device at a time.
This means you can either have the keyboard or the scanner active—but not both simultaneously.
Tip: Check your Bluetooth scanner’s manual to see how to enable the HiD Keyboard function.
It’s often easy to activate through a specific settings mode or by scanning a configuration code.
With the right settings, you can get the most out of your order picking app!
When you are order picking, you are already walking through the warehouse or the store. This is the perfect time to occasionally check the stock of a product. With the Inventory add-on we offer the option to scan the barcode or enter the sku/barcode (searching by product title is also possible for Woocommerce customers). We then retrieve the current stock of a product and this can be adjusted if necessary.
Inventory differences can be resolved during order picking. For example, consider products on a roll that are cut off during collection or to book new stock during a delivery.
Every shop has it’s own way of collecting orders. Some want to pick per order and others have multiple totes on a trolley. This is why we have the setting of the Order amount to pick at once.
When picking a single order you will start with the complete order list of open orders in the app. Here you can choose the order to pick.
Single order picking
Batch picking
When selecting something other than single order we change the layout in the app a bit. If you have the option of 5 orders at once, we combine 5 orders in 1 picking-run. Each order will get a letter starting from A and a number (the batchnumber). These numbers will stick to the order true the whole process.
When batchpicking we will combine the orders so you will only stop at a product once (for multiple orders).
Batch picking orders
Batchpicking productscreen
Yes you can, in Woocommerce. We build a column in the orderview of Woocommerce where you can see the picking status and assigned picker to a specific order. When opening an order, it is possible to pre-assign a picker.
APP SETTINGS
Settings
API key
Here is the pairing code to the App on the phone and the plugin in your WordPress / Woocommerce website. This can be scanned or entered manually (when opening the app for the first time).
Logo
Upload a company logo here
Picking type
Pick per order (enter 1) – After activation you will always receive 1 order at a time to pick. Adjusting the number to 2 or more is possible.
Pick per item (# fill in) – After activation you will receive # products at a time to pick. Leave this blank to display all open orders with all products.
Pickers
By default, the name of the person who purchased the Orderpicking App is shown here. By clicking on +Picker it is possible to add pickers. Replace the name in the text box and then press Save
Picking route
If the webshop is properly linked, the categories will be shown here how the webshop is divided. By moving these with the arrows, it is possible to match the layout in the store to the categories in the webshop. For example, be the first to choose the closest products when you start picking. Then the next category and so on. This way you prevent unnecessary rounds through the store or warehouse.
Status/Logs
Here we keep track of the various actions of the Orderpicking App. This can be useful for solving problems or questions.
Tickets
Do you need support or is there something you are missing? Then go to tickets in the My Environment menu and leave your question. We try to address these as quickly as possible and provide an appropriate response.
Sure, no problem. We get that we have to proof our self :-). You can try the Orderpicking App 30 days. Do you like it and is it working for your company, GREAT, then you start paying a little fee. Not that much if you see the benefits it brings to the table!
Mijnwebwinkel
Step 1 – Mijnwebwinkel
Log in to your Mijnwebwinkel account and navigate to:
Settings → Add-ons & Modules → Integrations & Connections
Click Add Token and select Order Picking App as the integration partner. Then click Save.
After saving, click Show Token to display the generated token. Copy this token, as you will need it to connect your webshop to Order Picking App.
Step 2 – Orderpickingapp.com
Go to Orderpickingapp.com and create an account or log in to your existing account.
Choose your preferred subscription plan to start your 30-day free trial. The trial period ends automatically and does not renew without your approval.
Fill in all required details, select Mijnwebwinkel as your platform, and create a password. Once registration is complete, you will receive an email containing your account details. Keep this email in a safe place for future reference.
Step 3 – Connect Mijnwebwinkel to Order Picking App
Open the settings page of your Order Picking App account.
Paste the token you copied from Mijnwebwinkel into the designated field and save your settings.
Order Picking App will automatically validate the connection through the Mijnwebwinkel API. Once the validation is successful, your webshop is connected and your orders will start synchronizing automatically.
Step 4 – Install the Mobile App
Download the Order Picking App on your smartphone:
- Apple App Store (iPhone)
- Google Play Store (Android)
Search for Order Picking App and install the application.
Step 5 – Connect the Mobile App
Your webshop is now connected. The final step is linking the mobile app to your account.
In the Order Picking App dashboard, go to Settings and open your API Key (barcode + numbers).
Open the mobile app and tap Scan API Key. Your phone’s camera will open.
Scan the barcode and save the connection in the app.
Once the scan is completed successfully, the mobile app is connected to your account and you are ready to start picking orders.
My account
APP SETTINGS
Settings
API key
Here is the pairing code to the App on the phone and the plugin in your WordPress / Woocommerce website. This can be scanned or entered manually (when opening the app for the first time).
Logo
Upload a company logo here
Picking type
Pick per order (enter 1) – After activation you will always receive 1 order at a time to pick. Adjusting the number to 2 or more is possible.
Pick per item (# fill in) – After activation you will receive # products at a time to pick. Leave this blank to display all open orders with all products.
Pickers
By default, the name of the person who purchased the Orderpicking App is shown here. By clicking on +Picker it is possible to add pickers. Replace the name in the text box and then press Save
Picking route
If the webshop is properly linked, the categories will be shown here how the webshop is divided. By moving these with the arrows, it is possible to match the layout in the store to the categories in the webshop. For example, be the first to choose the closest products when you start picking. Then the next category and so on. This way you prevent unnecessary rounds through the store or warehouse.
Status/Logs
Here we keep track of the various actions of the Orderpicking App. This can be useful for solving problems or questions.
Tickets
Do you need support or is there something you are missing? Then go to tickets in the My Environment menu and leave your question. We try to address these as quickly as possible and provide an appropriate response.
Pre-sale
Sure, no problem. We get that we have to proof our self :-). You can try the Orderpicking App 30 days. Do you like it and is it working for your company, GREAT, then you start paying a little fee. Not that much if you see the benefits it brings to the table!
Processing your orders with our tool is a very computing intensive task and requires some serious GPU power to make it work. When we can provide a free service we gladly do and been doing this for a lot of users worldwide with our other apps but can’t in this case. However, we are sure you will be amazed by the time-saving and minimized number of mistakes. You can try the Orderpicking App 30 days for free.
Prestashop
The Orderpicking App requires at least Android version 15 (Android 5.0 Lollipop) or higher.
This is not our own decision, but a requirement set by the Google Play Store. Google does not allow new apps or updates to be published for Android versions lower than 15. As a result, we are unable to make the app available for older devices.
We would love to support older versions, but publishing through the Play Store is technically not possible due to Google’s policies on security and compatibility.
Recommendation:
Please ensure your device runs Android 5.0 or newer. Most smartphones and tablets from the last few years already meet this requirement.
How to Set Up Batch Picking
1. Open App Settings Go to App Settings via My Account on orderpickingapp.com or in the WordPress plugin. Under the Picking Type setting, switch from Single Order Picking to Batch Picking. Save the settings and restart the app on your device.
2. Select a Picker and Orders In the app, select the picker who will be processing the orders. Optionally, enable the setting to manually choose which orders are included in the batch.
3. Start Picking
* If no orders have been claimed by the picker, the app will automatically load the oldest 5 open orders.
* Alternatively, you can select specific orders by scanning the order number or manually entering it.
You’ll now see the total number of orders in your batch. Tap Start Picking to begin the process.
Batch Picking
We’ll group orders into batches of 5 per picking run. Each bin on the cart should be labeled A, B, C, D, and E. When starting a picking run, you’ll receive a run number that applies to the entire cart (e.g. Run 31).
During picking, the first product may belong to multiple orders. In that case, the app will tell you which bin letter(s) to place the product in and how many units to pick for each.
Once all items have been picked, proceed to the packing screen. Here, you’ll see each order listed by its run number + bin letter (e.g. 31A, 31B, etc.). This allows you to match the picked items to the correct customer and prepare them for shipping.
o use the order picking app optimally with an external Bluetooth scanner and a keyboard, we recommend enabling the HiD Keyboard function on your scanner.
What does the HiD Keyboard function do?
This feature allows you to use both your keyboard and Bluetooth scanner simultaneously as input devices.
It’s ideal for situations where you need to alternate between entering data via the keyboard and scanning with the Bluetooth scanner.
What if my scanner doesn’t have a HiD Keyboard function?
If your scanner doesn’t support this function, you can only use one input device at a time.
This means you can either have the keyboard or the scanner active—but not both simultaneously.
Tip: Check your Bluetooth scanner’s manual to see how to enable the HiD Keyboard function.
It’s often easy to activate through a specific settings mode or by scanning a configuration code.
With the right settings, you can get the most out of your order picking app!
To obtain an efficient picking route, we have made it possible to arrange the products to be picked according to certain values.
There is an option to arrange the products by:
– Category
– SKU
– Barcode
– Custom picking location
By default, the picking route is set based on the webshop categories. These can be dragged in order in the plugin > Picking route. In addition, the SKU or Barcode can be set ascending and descending.
For Woocommerce, you have the option to create your own location hierarchy for the products (maximum 3 levels), just as the categories have been created.
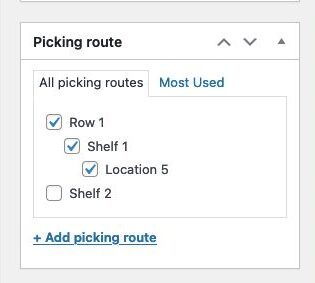
When you are order picking, you are already walking through the warehouse or the store. This is the perfect time to occasionally check the stock of a product. With the Inventory add-on we offer the option to scan the barcode or enter the sku/barcode (searching by product title is also possible for Woocommerce customers). We then retrieve the current stock of a product and this can be adjusted if necessary.
Inventory differences can be resolved during order picking. For example, consider products on a roll that are cut off during collection or to book new stock during a delivery.
Every shop has it’s own way of collecting orders. Some want to pick per order and others have multiple totes on a trolley. This is why we have the setting of the Order amount to pick at once.
When picking a single order you will start with the complete order list of open orders in the app. Here you can choose the order to pick.
Single order picking
Batch picking
When selecting something other than single order we change the layout in the app a bit. If you have the option of 5 orders at once, we combine 5 orders in 1 picking-run. Each order will get a letter starting from A and a number (the batchnumber). These numbers will stick to the order true the whole process.
When batchpicking we will combine the orders so you will only stop at a product once (for multiple orders).
Batch picking orders
Batchpicking productscreen
Step 1
Go to https://www.orderpickingapp.com and choose Plans & Pricing (or the green button at the top right).
Step 2
Enter all data, choose the desired platform of the webshop (Prestashop)
Step 3
After completing the order you will receive an email with the user details and the link of the account to be able to log in immediately.
Step 4 PRESTASHOP
Check if this in activate: mod_auth_basic on your hosting or server
Go in the PrestaShop back office, open the “Web service” page under the “Advanced Parameters” menu, and then choose “Yes” for the “Enable PrestaShop Webservice” option. In order to have access to the API you need to create an access key, this will allow you to finely tune the permissions you give to the different data of your shop. You will use this key later in each call to the API. Open the “Webservice” page under the “Advanced Parameters” menu, and then click the “Add new webservice key” button to access the account configuration section.
GET Permissions
1. orders
2. order_states
3. categories
4. products
5. stocks
6. carriers
7. stock_availables
8. customers
PUT
1. orders
2. stock_availables
Step 5 MY ACCOUNT
- Copy the created WEBSERVICE KEY and paste this in the MY ACCOUNT of the orderpickingapp.com settings page. Then Save
- Upload a company logo.
- Also choose here whether you pick per order or per x number of products. Leave your Picking Type empty and the app will show all orders/products to pick.
Step 6 APP INSTALL
Download the Orderpicking App on your phone. Go to the Apple App Store or the Google Play Store and search for Order Picking App
- Go to the Settings tab in My Account. Here is the API Key (Barcode + numbers).
- Open the app on the phone and press Scan API key. The phone’s camera opens.
- Scan the barcode and save it in the App. If all goes well, everything is now connected!
Selro
The Orderpicking App requires at least Android version 15 (Android 5.0 Lollipop) or higher.
This is not our own decision, but a requirement set by the Google Play Store. Google does not allow new apps or updates to be published for Android versions lower than 15. As a result, we are unable to make the app available for older devices.
We would love to support older versions, but publishing through the Play Store is technically not possible due to Google’s policies on security and compatibility.
Recommendation:
Please ensure your device runs Android 5.0 or newer. Most smartphones and tablets from the last few years already meet this requirement.
How to Set Up Batch Picking
1. Open App Settings Go to App Settings via My Account on orderpickingapp.com or in the WordPress plugin. Under the Picking Type setting, switch from Single Order Picking to Batch Picking. Save the settings and restart the app on your device.
2. Select a Picker and Orders In the app, select the picker who will be processing the orders. Optionally, enable the setting to manually choose which orders are included in the batch.
3. Start Picking
* If no orders have been claimed by the picker, the app will automatically load the oldest 5 open orders.
* Alternatively, you can select specific orders by scanning the order number or manually entering it.
You’ll now see the total number of orders in your batch. Tap Start Picking to begin the process.
Batch Picking
We’ll group orders into batches of 5 per picking run. Each bin on the cart should be labeled A, B, C, D, and E. When starting a picking run, you’ll receive a run number that applies to the entire cart (e.g. Run 31).
During picking, the first product may belong to multiple orders. In that case, the app will tell you which bin letter(s) to place the product in and how many units to pick for each.
Once all items have been picked, proceed to the packing screen. Here, you’ll see each order listed by its run number + bin letter (e.g. 31A, 31B, etc.). This allows you to match the picked items to the correct customer and prepare them for shipping.
Step 1
Go to https://www.orderpickingapp.com and choose Plans & Pricing (or the green button at the top right).
Step 2
Enter all data, choose the desired platform of the webshop (Selro)
Step 3
After completing the order you will receive an email with the user details and the link of the account to be able to log in immediately.
Step 4 SELRO
Create an API key with a secret in your Selro account.
By default API will be disabled on your account. To enable the API please send an email to support@selro.com. Once the API is enabled, you can access the keys by going into Settings -> Channel Integration -> API.
Step 5 MY ACCOUNT
Login at orderpickingapp.com/my-account and go to APP SETTINGS. Choose the shop and go to the settings tab.
- Copy the API key and Secret in the desired box
- Fill in all other settings and pickers.
Step 6 APP INSTALL
Download the Orderpicking App on your phone. Go to the Apple App Store or the Google Play Store and search for Order Picking App
- Go to the Settings tab in My Account. Here is the API Key (Barcode + numbers).
- Open the app on the phone and press Scan API key. The phone’s camera opens.
- Scan the barcode and save it in the App. If all goes well, everything is now connected!
o use the order picking app optimally with an external Bluetooth scanner and a keyboard, we recommend enabling the HiD Keyboard function on your scanner.
What does the HiD Keyboard function do?
This feature allows you to use both your keyboard and Bluetooth scanner simultaneously as input devices.
It’s ideal for situations where you need to alternate between entering data via the keyboard and scanning with the Bluetooth scanner.
What if my scanner doesn’t have a HiD Keyboard function?
If your scanner doesn’t support this function, you can only use one input device at a time.
This means you can either have the keyboard or the scanner active—but not both simultaneously.
Tip: Check your Bluetooth scanner’s manual to see how to enable the HiD Keyboard function.
It’s often easy to activate through a specific settings mode or by scanning a configuration code.
With the right settings, you can get the most out of your order picking app!
Settings
How to Set Up Batch Picking
1. Open App Settings Go to App Settings via My Account on orderpickingapp.com or in the WordPress plugin. Under the Picking Type setting, switch from Single Order Picking to Batch Picking. Save the settings and restart the app on your device.
2. Select a Picker and Orders In the app, select the picker who will be processing the orders. Optionally, enable the setting to manually choose which orders are included in the batch.
3. Start Picking
* If no orders have been claimed by the picker, the app will automatically load the oldest 5 open orders.
* Alternatively, you can select specific orders by scanning the order number or manually entering it.
You’ll now see the total number of orders in your batch. Tap Start Picking to begin the process.
Batch Picking
We’ll group orders into batches of 5 per picking run. Each bin on the cart should be labeled A, B, C, D, and E. When starting a picking run, you’ll receive a run number that applies to the entire cart (e.g. Run 31).
During picking, the first product may belong to multiple orders. In that case, the app will tell you which bin letter(s) to place the product in and how many units to pick for each.
Once all items have been picked, proceed to the packing screen. Here, you’ll see each order listed by its run number + bin letter (e.g. 31A, 31B, etc.). This allows you to match the picked items to the correct customer and prepare them for shipping.
o use the order picking app optimally with an external Bluetooth scanner and a keyboard, we recommend enabling the HiD Keyboard function on your scanner.
What does the HiD Keyboard function do?
This feature allows you to use both your keyboard and Bluetooth scanner simultaneously as input devices.
It’s ideal for situations where you need to alternate between entering data via the keyboard and scanning with the Bluetooth scanner.
What if my scanner doesn’t have a HiD Keyboard function?
If your scanner doesn’t support this function, you can only use one input device at a time.
This means you can either have the keyboard or the scanner active—but not both simultaneously.
Tip: Check your Bluetooth scanner’s manual to see how to enable the HiD Keyboard function.
It’s often easy to activate through a specific settings mode or by scanning a configuration code.
With the right settings, you can get the most out of your order picking app!
To obtain an efficient picking route, we have made it possible to arrange the products to be picked according to certain values.
There is an option to arrange the products by:
– Category
– SKU
– Barcode
– Custom picking location
By default, the picking route is set based on the webshop categories. These can be dragged in order in the plugin > Picking route. In addition, the SKU or Barcode can be set ascending and descending.
For Woocommerce, you have the option to create your own location hierarchy for the products (maximum 3 levels), just as the categories have been created.
Step 1
Go to https://www.orderpickingapp.com and choose Plans & Pricing (or the green button at the top right).
Step 2
Enter all data, choose the desired platform of the webshop (Prestashop)
Step 3
After completing the order you will receive an email with the user details and the link of the account to be able to log in immediately.
Step 4 PRESTASHOP
Check if this in activate: mod_auth_basic on your hosting or server
Go in the PrestaShop back office, open the “Web service” page under the “Advanced Parameters” menu, and then choose “Yes” for the “Enable PrestaShop Webservice” option. In order to have access to the API you need to create an access key, this will allow you to finely tune the permissions you give to the different data of your shop. You will use this key later in each call to the API. Open the “Webservice” page under the “Advanced Parameters” menu, and then click the “Add new webservice key” button to access the account configuration section.
GET Permissions
1. orders
2. order_states
3. categories
4. products
5. stocks
6. carriers
7. stock_availables
8. customers
PUT
1. orders
2. stock_availables
Step 5 MY ACCOUNT
- Copy the created WEBSERVICE KEY and paste this in the MY ACCOUNT of the orderpickingapp.com settings page. Then Save
- Upload a company logo.
- Also choose here whether you pick per order or per x number of products. Leave your Picking Type empty and the app will show all orders/products to pick.
Step 6 APP INSTALL
Download the Orderpicking App on your phone. Go to the Apple App Store or the Google Play Store and search for Order Picking App
- Go to the Settings tab in My Account. Here is the API Key (Barcode + numbers).
- Open the app on the phone and press Scan API key. The phone’s camera opens.
- Scan the barcode and save it in the App. If all goes well, everything is now connected!
APP SETTINGS
Settings
API key
Here is the pairing code to the App on the phone and the plugin in your WordPress / Woocommerce website. This can be scanned or entered manually (when opening the app for the first time).
Logo
Upload a company logo here
Picking type
Pick per order (enter 1) – After activation you will always receive 1 order at a time to pick. Adjusting the number to 2 or more is possible.
Pick per item (# fill in) – After activation you will receive # products at a time to pick. Leave this blank to display all open orders with all products.
Pickers
By default, the name of the person who purchased the Orderpicking App is shown here. By clicking on +Picker it is possible to add pickers. Replace the name in the text box and then press Save
Picking route
If the webshop is properly linked, the categories will be shown here how the webshop is divided. By moving these with the arrows, it is possible to match the layout in the store to the categories in the webshop. For example, be the first to choose the closest products when you start picking. Then the next category and so on. This way you prevent unnecessary rounds through the store or warehouse.
Status/Logs
Here we keep track of the various actions of the Orderpicking App. This can be useful for solving problems or questions.
Tickets
Do you need support or is there something you are missing? Then go to tickets in the My Environment menu and leave your question. We try to address these as quickly as possible and provide an appropriate response.
Shopify
The Orderpicking App requires at least Android version 15 (Android 5.0 Lollipop) or higher.
This is not our own decision, but a requirement set by the Google Play Store. Google does not allow new apps or updates to be published for Android versions lower than 15. As a result, we are unable to make the app available for older devices.
We would love to support older versions, but publishing through the Play Store is technically not possible due to Google’s policies on security and compatibility.
Recommendation:
Please ensure your device runs Android 5.0 or newer. Most smartphones and tablets from the last few years already meet this requirement.
How to Set Up Batch Picking
1. Open App Settings Go to App Settings via My Account on orderpickingapp.com or in the WordPress plugin. Under the Picking Type setting, switch from Single Order Picking to Batch Picking. Save the settings and restart the app on your device.
2. Select a Picker and Orders In the app, select the picker who will be processing the orders. Optionally, enable the setting to manually choose which orders are included in the batch.
3. Start Picking
* If no orders have been claimed by the picker, the app will automatically load the oldest 5 open orders.
* Alternatively, you can select specific orders by scanning the order number or manually entering it.
You’ll now see the total number of orders in your batch. Tap Start Picking to begin the process.
Batch Picking
We’ll group orders into batches of 5 per picking run. Each bin on the cart should be labeled A, B, C, D, and E. When starting a picking run, you’ll receive a run number that applies to the entire cart (e.g. Run 31).
During picking, the first product may belong to multiple orders. In that case, the app will tell you which bin letter(s) to place the product in and how many units to pick for each.
Once all items have been picked, proceed to the packing screen. Here, you’ll see each order listed by its run number + bin letter (e.g. 31A, 31B, etc.). This allows you to match the picked items to the correct customer and prepare them for shipping.
o use the order picking app optimally with an external Bluetooth scanner and a keyboard, we recommend enabling the HiD Keyboard function on your scanner.
What does the HiD Keyboard function do?
This feature allows you to use both your keyboard and Bluetooth scanner simultaneously as input devices.
It’s ideal for situations where you need to alternate between entering data via the keyboard and scanning with the Bluetooth scanner.
What if my scanner doesn’t have a HiD Keyboard function?
If your scanner doesn’t support this function, you can only use one input device at a time.
This means you can either have the keyboard or the scanner active—but not both simultaneously.
Tip: Check your Bluetooth scanner’s manual to see how to enable the HiD Keyboard function.
It’s often easy to activate through a specific settings mode or by scanning a configuration code.
With the right settings, you can get the most out of your order picking app!
When you are order picking, you are already walking through the warehouse or the store. This is the perfect time to occasionally check the stock of a product. With the Inventory add-on we offer the option to scan the barcode or enter the sku/barcode (searching by product title is also possible for Woocommerce customers). We then retrieve the current stock of a product and this can be adjusted if necessary.
Inventory differences can be resolved during order picking. For example, consider products on a roll that are cut off during collection or to book new stock during a delivery.
Every shop has it’s own way of collecting orders. Some want to pick per order and others have multiple totes on a trolley. This is why we have the setting of the Order amount to pick at once.
When picking a single order you will start with the complete order list of open orders in the app. Here you can choose the order to pick.
Single order picking
Batch picking
When selecting something other than single order we change the layout in the app a bit. If you have the option of 5 orders at once, we combine 5 orders in 1 picking-run. Each order will get a letter starting from A and a number (the batchnumber). These numbers will stick to the order true the whole process.
When batchpicking we will combine the orders so you will only stop at a product once (for multiple orders).
Batch picking orders
Batchpicking productscreen
You can base the picking route on your product categories but also on a meta field “Locatie” in Shopify or Wix. You can then enter a value for each product that will be sorted alphabetically. For example A-1, A, 2 etc.
Step 1 SHOPIFY
Download the Orderpicking App from the Shopify app store and install it. Choose your trail period of 30 days.
Step 2 MY ACCOUNT
- Upload a company logo.
- Also choose here whether you pick per order or per x number of products. Leave your Picking Type empty and the app will show all orders/products to pick.
Step 3 APP INSTALL
Download the Orderpicking App on your phone. Go to the Apple App Store or the Google Play Store and search for Order Picking App
Everything installed now. Only the connection between the app on the phone and the account is still necessary.
- Go to the Settings tab in My Environment. Here is the API Key (Barcode + numbers).
- Open the app on the phone and press Scan API key. The phone’s camera opens.
- Scan the barcode and save it in the App. If all goes well, everything is now connected!
Shopwired
The Orderpicking App requires at least Android version 15 (Android 5.0 Lollipop) or higher.
This is not our own decision, but a requirement set by the Google Play Store. Google does not allow new apps or updates to be published for Android versions lower than 15. As a result, we are unable to make the app available for older devices.
We would love to support older versions, but publishing through the Play Store is technically not possible due to Google’s policies on security and compatibility.
Recommendation:
Please ensure your device runs Android 5.0 or newer. Most smartphones and tablets from the last few years already meet this requirement.
How to Set Up Batch Picking
1. Open App Settings Go to App Settings via My Account on orderpickingapp.com or in the WordPress plugin. Under the Picking Type setting, switch from Single Order Picking to Batch Picking. Save the settings and restart the app on your device.
2. Select a Picker and Orders In the app, select the picker who will be processing the orders. Optionally, enable the setting to manually choose which orders are included in the batch.
3. Start Picking
* If no orders have been claimed by the picker, the app will automatically load the oldest 5 open orders.
* Alternatively, you can select specific orders by scanning the order number or manually entering it.
You’ll now see the total number of orders in your batch. Tap Start Picking to begin the process.
Batch Picking
We’ll group orders into batches of 5 per picking run. Each bin on the cart should be labeled A, B, C, D, and E. When starting a picking run, you’ll receive a run number that applies to the entire cart (e.g. Run 31).
During picking, the first product may belong to multiple orders. In that case, the app will tell you which bin letter(s) to place the product in and how many units to pick for each.
Once all items have been picked, proceed to the packing screen. Here, you’ll see each order listed by its run number + bin letter (e.g. 31A, 31B, etc.). This allows you to match the picked items to the correct customer and prepare them for shipping.
Step 1 Shopwired
Download the Orderpicking App from the Shopwired app store and install it. Choose to create a trail periode account on the app page.
Step 2 Orderpickingapp.com
You will be redirected to Orderpickingapp.com to choose your desired plan. This way you can start the 30 day free trail that will stop automaticly. Fill in all fields, choose the platform Shopwired and enter a password of your choosing. When you proceed, you will receive an email with your API key and password. Store this email in a save place for future use.
Step 3 Shopwired API key
Go back to Shopwired and open de Orderpicking App. Here your can enter the API key you received in the mail. If you have any questions here, please feel free to contact us via support@orderpickingapp.nl or Whatsapp.
Step 4 APP INSTALL
Download the Orderpicking App on your phone. Go to the Apple App Store or the Google Play Store and search for Order Picking App
Everything installed now. Only the connection between the app on the phone and the account is still necessary.
- Go to the App Settings tab in the Orderpickingapp.com / My Account. Here is the API Key (Barcode + numbers).
- Open the app on the phone and press Scan API key. The phone’s camera opens.
- Scan the barcode and save it in the App. If all goes well, everything is now connected!
o use the order picking app optimally with an external Bluetooth scanner and a keyboard, we recommend enabling the HiD Keyboard function on your scanner.
What does the HiD Keyboard function do?
This feature allows you to use both your keyboard and Bluetooth scanner simultaneously as input devices.
It’s ideal for situations where you need to alternate between entering data via the keyboard and scanning with the Bluetooth scanner.
What if my scanner doesn’t have a HiD Keyboard function?
If your scanner doesn’t support this function, you can only use one input device at a time.
This means you can either have the keyboard or the scanner active—but not both simultaneously.
Tip: Check your Bluetooth scanner’s manual to see how to enable the HiD Keyboard function.
It’s often easy to activate through a specific settings mode or by scanning a configuration code.
With the right settings, you can get the most out of your order picking app!
Subscription
Sure, no problem. We get that we have to proof our self :-). You can try the Orderpicking App 30 days. Do you like it and is it working for your company, GREAT, then you start paying a little fee. Not that much if you see the benefits it brings to the table!
Processing your orders with our tool is a very computing intensive task and requires some serious GPU power to make it work. When we can provide a free service we gladly do and been doing this for a lot of users worldwide with our other apps but can’t in this case. However, we are sure you will be amazed by the time-saving and minimized number of mistakes. You can try the Orderpicking App 30 days for free.
Technical
To add custom data from Woocommerce to the App into the ordernote field. Past this inside your function.php. Disclaimer: Only do this if you know what you’re doing 🙂
add_filter(‘orderpickingapp_order_note’, ‘custom_orderpickingapp_order_note’, 10, 2);
function custom_orderpickingapp_order_note( $value, $order_id ) {
$order = wc_get_order( $order_id );
if ( $order ) {
$user_id = $order->get_user_id();
if ( $user_id ) {
RETURN VALUE
}
}
return $value;
}
The Orderpicking App requires at least Android version 15 (Android 5.0 Lollipop) or higher.
This is not our own decision, but a requirement set by the Google Play Store. Google does not allow new apps or updates to be published for Android versions lower than 15. As a result, we are unable to make the app available for older devices.
We would love to support older versions, but publishing through the Play Store is technically not possible due to Google’s policies on security and compatibility.
Recommendation:
Please ensure your device runs Android 5.0 or newer. Most smartphones and tablets from the last few years already meet this requirement.
o use the order picking app optimally with an external Bluetooth scanner and a keyboard, we recommend enabling the HiD Keyboard function on your scanner.
What does the HiD Keyboard function do?
This feature allows you to use both your keyboard and Bluetooth scanner simultaneously as input devices.
It’s ideal for situations where you need to alternate between entering data via the keyboard and scanning with the Bluetooth scanner.
What if my scanner doesn’t have a HiD Keyboard function?
If your scanner doesn’t support this function, you can only use one input device at a time.
This means you can either have the keyboard or the scanner active—but not both simultaneously.
Tip: Check your Bluetooth scanner’s manual to see how to enable the HiD Keyboard function.
It’s often easy to activate through a specific settings mode or by scanning a configuration code.
With the right settings, you can get the most out of your order picking app!
Step 1
Go to https://www.orderpickingapp.com and choose Plans & Pricing (or the green button at the top right). Choose the right plan for the period after the 30 free trail days. We don’t extend the trail automatic .
Step 2
Enter all data, choose the desired platform of the webshop (CCV Shop) in the platform dropdown.
Step 3
After completing the order you will receive an email with the user details and the link of the my account on Orderpicking App.com to be able to log in immediately.
Step 4 CCV Shop
Go in the CCV Shop back office, open “Settings” page in the menu, and then choose “API Settings”. Give the API key an unique name and go the the tab Permissions. Change the permissions like this:
Name Method
categories GET
orders GET/POST
ordernotes GET/POST
orderrows GET
products GET/POST/PATCH
productvariations GET
Go back to the tab Global and copy the API key and API secret.
Step 5 MY ACCOUNT
- Copy the created API key and API Secret paste this in the MY ACCOUNT of the orderpickingapp.com settings page. Then Save
- Upload a company logo.
- Also choose here whether you pick per order or per x number of products. Leave your Picking Type empty and the app will show all orders/products to pick.
Step 6 APP INSTALL
Download the Orderpicking App on your phone. Go to the Apple App Store or the Google Play Store and search for Order Picking App
- Go to the Settings tab in My Account. Here is the API Key (Barcode + numbers).
- Open the app on the phone and press Scan API key. The phone’s camera opens.
- Scan the barcode and save it in the App. If all goes well, everything is now connected!
Do you need support or is there something you are missing? Then go to tickets in the My Account menu and leave your question. We try to address these as quickly as possible and provide an appropriate response.
Every webshop has it’s own way of connecting. For Woocommerce we use a custom plugin. Just search for the plugin Orderpicking App and you will find ours. Install, activate it and your almost done in WordPress. Go to our portal, login to your My Account and copy the API key and insert this in de WordPress plugin.
Wix
The Orderpicking App requires at least Android version 15 (Android 5.0 Lollipop) or higher.
This is not our own decision, but a requirement set by the Google Play Store. Google does not allow new apps or updates to be published for Android versions lower than 15. As a result, we are unable to make the app available for older devices.
We would love to support older versions, but publishing through the Play Store is technically not possible due to Google’s policies on security and compatibility.
Recommendation:
Please ensure your device runs Android 5.0 or newer. Most smartphones and tablets from the last few years already meet this requirement.
How to Set Up Batch Picking
1. Open App Settings Go to App Settings via My Account on orderpickingapp.com or in the WordPress plugin. Under the Picking Type setting, switch from Single Order Picking to Batch Picking. Save the settings and restart the app on your device.
2. Select a Picker and Orders In the app, select the picker who will be processing the orders. Optionally, enable the setting to manually choose which orders are included in the batch.
3. Start Picking
* If no orders have been claimed by the picker, the app will automatically load the oldest 5 open orders.
* Alternatively, you can select specific orders by scanning the order number or manually entering it.
You’ll now see the total number of orders in your batch. Tap Start Picking to begin the process.
Batch Picking
We’ll group orders into batches of 5 per picking run. Each bin on the cart should be labeled A, B, C, D, and E. When starting a picking run, you’ll receive a run number that applies to the entire cart (e.g. Run 31).
During picking, the first product may belong to multiple orders. In that case, the app will tell you which bin letter(s) to place the product in and how many units to pick for each.
Once all items have been picked, proceed to the packing screen. Here, you’ll see each order listed by its run number + bin letter (e.g. 31A, 31B, etc.). This allows you to match the picked items to the correct customer and prepare them for shipping.
o use the order picking app optimally with an external Bluetooth scanner and a keyboard, we recommend enabling the HiD Keyboard function on your scanner.
What does the HiD Keyboard function do?
This feature allows you to use both your keyboard and Bluetooth scanner simultaneously as input devices.
It’s ideal for situations where you need to alternate between entering data via the keyboard and scanning with the Bluetooth scanner.
What if my scanner doesn’t have a HiD Keyboard function?
If your scanner doesn’t support this function, you can only use one input device at a time.
This means you can either have the keyboard or the scanner active—but not both simultaneously.
Tip: Check your Bluetooth scanner’s manual to see how to enable the HiD Keyboard function.
It’s often easy to activate through a specific settings mode or by scanning a configuration code.
With the right settings, you can get the most out of your order picking app!
Step 1 Wix
Download the Orderpicking App from the Wix app store and install it. Choose your trail period of 30 days.
Step 2 MY ACCOUNT
- Upload a company logo.
- Also choose here whether you pick per order or per x number of products. Leave your Picking Type empty and the app will show all orders/products to pick.
Step 3 APP INSTALL
Download the Orderpicking App on your phone. Go to the Apple App Store or the Google Play Store and search for Order Picking App
Everything installed now. Only the connection between the app on the phone and the account is still necessary.
- Go to the Settings tab in the Wix Orderpicking App. Here is the API Key (Barcode + numbers).
- Open the app on the phone and press Scan API key. The phone’s camera opens.
- Scan the barcode and save it in the App. If all goes well, everything is now connected!
When you are order picking, you are already walking through the warehouse or the store. This is the perfect time to occasionally check the stock of a product. With the Inventory add-on we offer the option to scan the barcode or enter the sku/barcode (searching by product title is also possible for Woocommerce customers). We then retrieve the current stock of a product and this can be adjusted if necessary.
Inventory differences can be resolved during order picking. For example, consider products on a roll that are cut off during collection or to book new stock during a delivery.
Every shop has it’s own way of collecting orders. Some want to pick per order and others have multiple totes on a trolley. This is why we have the setting of the Order amount to pick at once.
When picking a single order you will start with the complete order list of open orders in the app. Here you can choose the order to pick.
Single order picking
Batch picking
When selecting something other than single order we change the layout in the app a bit. If you have the option of 5 orders at once, we combine 5 orders in 1 picking-run. Each order will get a letter starting from A and a number (the batchnumber). These numbers will stick to the order true the whole process.
When batchpicking we will combine the orders so you will only stop at a product once (for multiple orders).
Batch picking orders
Batchpicking productscreen
You can base the picking route on your product categories but also on a meta field “Locatie” in Shopify or Wix. You can then enter a value for each product that will be sorted alphabetically. For example A-1, A, 2 etc.
Woocommerce
Order Picking App can also retrieve and use ATUM product data through custom filters and hooks. The script below allows you to use the Supplier SKU and Barcode fields from ATUM instead of the default WooCommerce SKU and barcode data.
By implementing these filters, Order Picking App will read the corresponding ATUM values, making it easier to integrate your existing inventory and supplier management workflow without relying solely on the standard WooCommerce product identifiers.
The following code example demonstrates how to replace the default WooCommerce SKU and barcode fields with the Supplier SKU and Barcode fields provided by ATUM.
add_filter('orderpickingapp_product_data', function($product_data, $item) {
global $wpdb;
$product_id = 0;
if (is_object($item) && method_exists($item, 'get_product_id')) {
$product_id = $item->get_product_id();
} elseif (is_object($item) && method_exists($item, 'get_id')) {
$product_id = $item->get_id();
} elseif (is_array($item)) {
$product_id = $item['product_id'] ?? $item['id'] ?? 0;
}
if (!$product_id && !empty($product_data['product_id'])) {
$product_id = $product_data['product_id'];
}
if (!$product_id) {
return $product_data;
}
$atum_data = $wpdb->get_row(
$wpdb->prepare(
"SELECT barcode, supplier_sku
FROM {$wpdb->prefix}atum_product_data
WHERE product_id = %d",
absint($product_id)
),
ARRAY_A
);
if (!empty($atum_data['barcode'])) {
$product_data['barcode'] = $atum_data['barcode'];
}
if (!empty($atum_data['supplier_sku'])) {
$product_data['second_barcode'] = $atum_data['supplier_sku'];
}
return $product_data;
}, 10, 2);
To add custom data from Woocommerce to the App into the ordernote field. Past this inside your function.php. Disclaimer: Only do this if you know what you’re doing 🙂
add_filter(‘orderpickingapp_order_note’, ‘custom_orderpickingapp_order_note’, 10, 2);
function custom_orderpickingapp_order_note( $value, $order_id ) {
$order = wc_get_order( $order_id );
if ( $order ) {
$user_id = $order->get_user_id();
if ( $user_id ) {
RETURN VALUE
}
}
return $value;
}
To insert your own custom product attribute in your picking phase by inserting this custom code in your function.php. Replace the red field for your own label (Brand) and attribute key (i.g. pa_brand)
add_filter(‘opa_custom_product_field_label’, ‘custom_opa_custom_product_field_label’, 10, 3);
function custom_opa_custom_product_field_label( $value, $product_id, $item_id ) {
return ‘YOUR OWN LABEL‘;
}
add_filter(‘opa_custom_product_field’, ‘custom_opa_custom_product_field’, 10, 3);
function custom_opa_custom_product_field( $value, $product_id, $item_id ) {
$item = new WC_Order_Item_Product( $item_id );
$product = $item->get_product();
if ( $product ) {
$attributeValue = $product->get_attribute( ‘YOUR ATTRIBUTE KEY’ );
if ( ! empty( $attributeValue ) ) {
return $attributeValue;
}
}
return $value;
}
The Orderpicking App requires at least Android version 15 (Android 5.0 Lollipop) or higher.
This is not our own decision, but a requirement set by the Google Play Store. Google does not allow new apps or updates to be published for Android versions lower than 15. As a result, we are unable to make the app available for older devices.
We would love to support older versions, but publishing through the Play Store is technically not possible due to Google’s policies on security and compatibility.
Recommendation:
Please ensure your device runs Android 5.0 or newer. Most smartphones and tablets from the last few years already meet this requirement.
How to Set Up Batch Picking
1. Open App Settings Go to App Settings via My Account on orderpickingapp.com or in the WordPress plugin. Under the Picking Type setting, switch from Single Order Picking to Batch Picking. Save the settings and restart the app on your device.
2. Select a Picker and Orders In the app, select the picker who will be processing the orders. Optionally, enable the setting to manually choose which orders are included in the batch.
3. Start Picking
* If no orders have been claimed by the picker, the app will automatically load the oldest 5 open orders.
* Alternatively, you can select specific orders by scanning the order number or manually entering it.
You’ll now see the total number of orders in your batch. Tap Start Picking to begin the process.
Batch Picking
We’ll group orders into batches of 5 per picking run. Each bin on the cart should be labeled A, B, C, D, and E. When starting a picking run, you’ll receive a run number that applies to the entire cart (e.g. Run 31).
During picking, the first product may belong to multiple orders. In that case, the app will tell you which bin letter(s) to place the product in and how many units to pick for each.
Once all items have been picked, proceed to the packing screen. Here, you’ll see each order listed by its run number + bin letter (e.g. 31A, 31B, etc.). This allows you to match the picked items to the correct customer and prepare them for shipping.
Once you’ve started the trial, installed the plugin, and downloaded the app, everything should normally function as expected. However, it seems the issue you’re encountering is that the webshop isn’t connecting to the Orderpicking App portal.
If you’re using the Force Login plugin, this could be the cause—it’s likely blocking the REST API connection required for communication between the webshop and our app.
To resolve this, please add the following code to your functions.php file:
function opa_remove_force_login_rest_block() {
    remove_filter( 'rest_authentication_errors', 'v_forcelogin_rest_access', 99 );
}
add_action( 'after_setup_theme', 'opa_remove_force_login_rest_block' );
This snippet disables the restriction imposed by the Force Login plugin on REST API requests, restoring the necessary communication with our portal.
Let us know if the issue persists after applying this fix!
o use the order picking app optimally with an external Bluetooth scanner and a keyboard, we recommend enabling the HiD Keyboard function on your scanner.
What does the HiD Keyboard function do?
This feature allows you to use both your keyboard and Bluetooth scanner simultaneously as input devices.
It’s ideal for situations where you need to alternate between entering data via the keyboard and scanning with the Bluetooth scanner.
What if my scanner doesn’t have a HiD Keyboard function?
If your scanner doesn’t support this function, you can only use one input device at a time.
This means you can either have the keyboard or the scanner active—but not both simultaneously.
Tip: Check your Bluetooth scanner’s manual to see how to enable the HiD Keyboard function.
It’s often easy to activate through a specific settings mode or by scanning a configuration code.
With the right settings, you can get the most out of your order picking app!
If you want to add your client phone number to your orderview, place this custom code in the function.php of your webshop
add_filter( ‘opa_custom_order_field’, ‘add_opa_custom_order_field’, 10, 2 );
function add_opa_custom_order_field( $value, $order_id ){
$order = wc_get_order($order_id);
$value = $order->get_billing_phone();
return $value;
}
To obtain an efficient picking route, we have made it possible to arrange the products to be picked according to certain values.
There is an option to arrange the products by:
– Category
– SKU
– Barcode
– Custom picking location
By default, the picking route is set based on the webshop categories. These can be dragged in order in the plugin > Picking route. In addition, the SKU or Barcode can be set ascending and descending.
For Woocommerce, you have the option to create your own location hierarchy for the products (maximum 3 levels), just as the categories have been created.
When you are order picking, you are already walking through the warehouse or the store. This is the perfect time to occasionally check the stock of a product. With the Inventory add-on we offer the option to scan the barcode or enter the sku/barcode (searching by product title is also possible for Woocommerce customers). We then retrieve the current stock of a product and this can be adjusted if necessary.
Inventory differences can be resolved during order picking. For example, consider products on a roll that are cut off during collection or to book new stock during a delivery.
Every shop has it’s own way of collecting orders. Some want to pick per order and others have multiple totes on a trolley. This is why we have the setting of the Order amount to pick at once.
When picking a single order you will start with the complete order list of open orders in the app. Here you can choose the order to pick.
Single order picking
Batch picking
When selecting something other than single order we change the layout in the app a bit. If you have the option of 5 orders at once, we combine 5 orders in 1 picking-run. Each order will get a letter starting from A and a number (the batchnumber). These numbers will stick to the order true the whole process.
When batchpicking we will combine the orders so you will only stop at a product once (for multiple orders).
Batch picking orders
Batchpicking productscreen
Yes you can, in Woocommerce. We build a column in the orderview of Woocommerce where you can see the picking status and assigned picker to a specific order. When opening an order, it is possible to pre-assign a picker.
If you go to a product you see a box called: Picking route. The same as with the categories, you can add locations (max 3 levels) where the product is located. In the Orderpicking App plugin, tab Picking route, you have the option to drag and drop locations in the right order. In our app we will sort the products according to this.
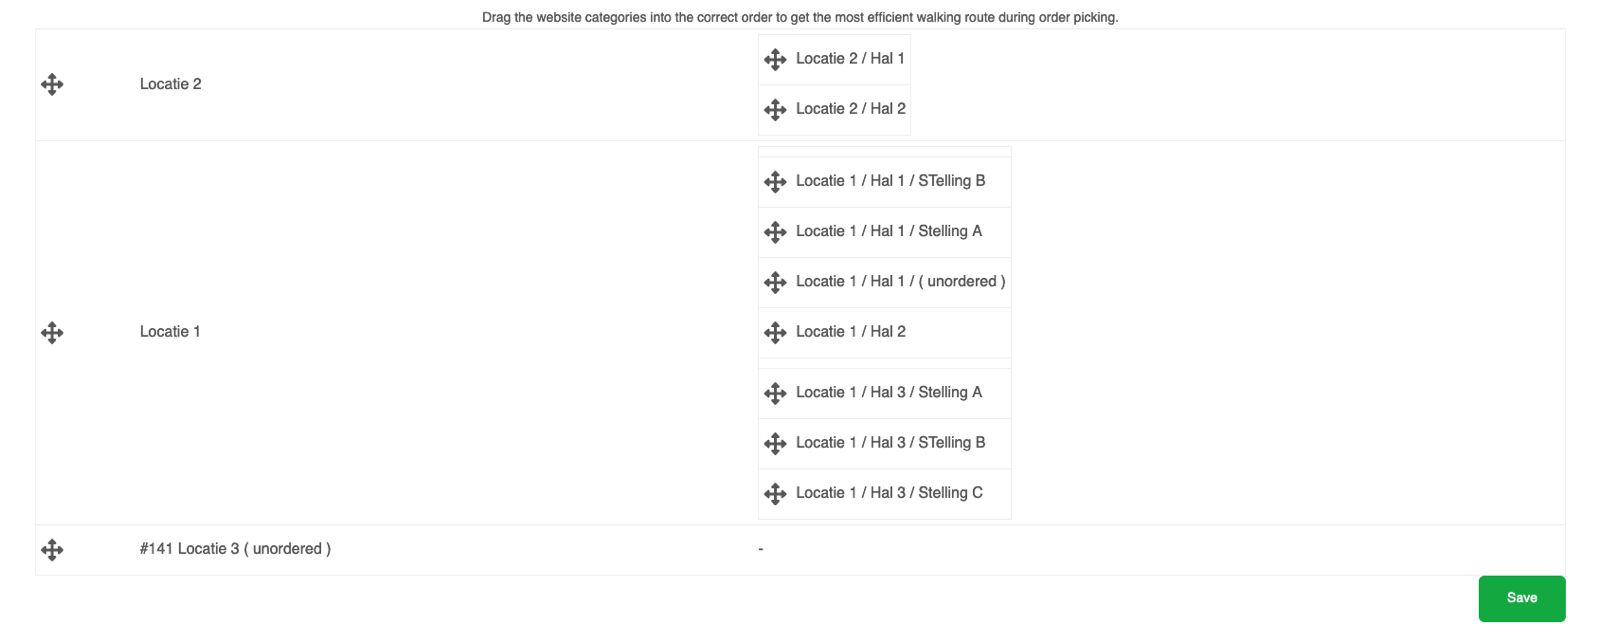
Order Status: Processing in WooCommerce
The order status “Processing” in WooCommerce indicates that an order has been received and is currently being prepared for fulfillment. This status is crucial for the Orderpicking App, as it serves as a trigger for importing the order details into the app for efficient processing and fulfillment.
When an order is assigned the “Processing” status, it means that the payment has been successfully verified, and the seller has acknowledged the order. This status typically occurs after a customer completes the checkout process and the payment is confirmed.
Once the Orderpicking App imports an order with the “Processing” status, it enables the app to streamline the order fulfillment process. The app retrieves relevant order information, such as product details, quantities, customer details, and shipping information. This allows the fulfillment team to efficiently pick, pack, and ship the items to the customer.
By importing “Processing” orders into the Orderpicking App, you can ensure that your fulfillment operations are synchronized with your WooCommerce store. This integration helps prevent delays and errors by providing real-time access to order information, reducing the likelihood of stockouts or missed deliveries.
Additionally, the Orderpicking App can provide order status updates, enabling you to track the progress of each order as it moves through the fulfillment process. This visibility allows you to keep your customers informed about their order’s progress and provides them with a better overall shopping experience.
In summary, when an order has the status “Processing” in WooCommerce, the Orderpicking App imports it to facilitate efficient order fulfillment. This integration ensures that the right products are picked, packed, and shipped to customers promptly, leading to improved customer satisfaction and operational efficiency.
Step 1
Go to https://www.orderpickingapp.com and choose Plans & Pricing (or the green button at the top right).
Step 2
Enter all data, choose the desired platform of the webshop (Woocommerce)
Step 3
After completing the order you will receive an email with the user details and the link of the account to be able to log in immediately.
Step 4 WORDPRESS
Download the plugin for Woocommerce, go to the admin part of your website, go to Plugin, Add new plugin, at the top: Upload plugin, install and activate it. Copy and insert the API Key in your plugin. You can find the key in your My Account at orderpickingapp.com
Step 5 MY ACCOUNT
Upload a company logo. Choose here whether you pick per order or per x number of products. Leave your Picking Type empty and the app will show all orders/products to pick.
Step 6 APP
Download the Orderpicking App on your phone. Go to the Appstore or the Google Play store and search for Order Picking App
Everything installed now. Only the connection between the app on the phone and the account is still necessary. Go to the Settings tab in My Account. Here is the API Key (Barcode + numbers). Open the app on the phone and press Scan API key. The phone’s camera opens. Scan the barcode and save it in the App. If all goes well, everything is now connected!
Every webshop has it’s own way of connecting. For Woocommerce we use a custom plugin. Just search for the plugin Orderpicking App and you will find ours. Install, activate it and your almost done in WordPress. Go to our portal, login to your My Account and copy the API key and insert this in de WordPress plugin.